If you finish installing the QEMU-NVMe, Now You can use the newest version virtual OpenChannelSSD.
i.e You can try to use LightNVM with virtual OpenChannelSSD.
Befoer starting this process, I recommend you to read Getting started of the official lightnvm site.
As you can see the official lightnvm site.
you can know the following :
-
What version of linux support lightnvm ?
-
What tool do you need to install LightNVM on QEMU-NMVe. ?
-
Of course. How Can I install ane execute QEMU-NVMe for OpenChannelSSD ?
First, I realized What I misunderstan about virt-manager.
I think, with GUI,virt-manager, I can use QEMU-NVMe with virt-Manager. But I realized that is wrong.
from Redhat site written in 20 Apr 2016 on redHat board.
Becuase, When you use virtualization of kernel, you use Libvirt(the virtualization API).
So Libvirt of Redhat on CentOS 7 doesn’t even support it explicitly yet. So I can understan I have to use command Line to execute NVMe device. i.e virt-manager doesn’t support how to add NVMe device.
So I will use QEMU-NVMe for openchannelSSD on command line.
Before starting installing lighiNVM, so far, I will brief what I have done about QEMU-KVM and QEMU-NVMe.
Summary of installing QEMU-KVM on HOST OS
 $ sudo yum install -y qemu-kvm qemu-img virt-manager libvirt libvirt-python libvirt-client virt-install (virt-viewer)
 -- instead of the above command, I recommend you to contain virt-viewer. rather, you have to install something related to virt-viewer. So what I recommend is :
 $ sudo yum install -y qemu-kvm qemu-img virt-manager libvirt libvirt-python libvirt-client virt-install virt-viewer
 $ reboot OR shutdown -r now
 $ virt-manager
The above command is basic setting to execute QEMU-KVM with GUI, virt-manager tool.
And if you want to how to install GUEST OS, please see my blog’s QEMU-URL
Of course, When you install “Development Tools” with yum to compile kernel.
If you don’t install “Development Tools”, please add one line first like this
$ sudo yum groupinstall “Development Tools”
Summary of install and compiling QEMU-NVMe for OpenChannelSSD on HOST OS
- first you need to install Qemu-nvme
- If you already installed "Development tools", just do it as follows.
$ git clone https://github.com/OpenChannelSSD/qemu-nvme.git
$ cd qemu-nvme
- this is my chocie when I evaluate FIO 4k ramdomwrit T1Q256 FOX(fresh of box)
$ ./configure --python=/usr/bin/python2 --enable-kvm --target-list=x86_64-softmmu --enable-linux-aio --prefix=$HOME/qemu-nvme

- At this time. You find error
- solution for that is below
$ sudo yum install -y gtk2-devel OR $ sudo yum install libaio-devel

- One more time, ./configure ~~~ . After that
$ make -j8
$ sudo make install

- if you want to use Ramdisk
$ mkdir ./ramdisk OR $ mkdir ./rootOfRamdisk
$ sudo mount -t tmpfs -o size=7G tmpfs ./ramdisk OR $ sudo mount -t tmpfs -o size=7G tmpfs ./rootOfRamdisk
$ cd ramdisk OR $ cd rootOFRamdisk

- for Qemu-nvme
$ dd if=/dev/zero of=./blknvme bs=1G count=4
$ ~/qemu-nvme/bin/qemu-system-x86_64 -m 16G -smp 4 --enable-kvm -hda /var/lib/libvirt/images/vDisk.qcow2(virtual device) -drive file=./blknvme(virtual nvme),if=none,id=mynvme -device nvme,drive=mynvme,serial=deadbeef,lver=1,~~~(another option) -monitor stdio

- For example command
$ ~/qemu-nvme/bin/qemu-system-x86_64 -m 16G -smp 4 --enable-kvm -hda /var/lib/libvirt/images/vDisk.qcow2 -drive file=./blknvme,if=none,id=mynvme -device nvme,drive=mynvme,serial=deadbeef,lver=1,ll2pmode=0,lnum_lun=4,lnum_pln=2,lsecs_per_pg=4,lpgs_per_blk=512 -monitor stdio
GuestOS’s status of QEMU-KVM before installing QEMU-NVMe.
On QEMU-KVM, you can perceive NVMe device and PCI related to NVMe.
But on QEMU-NVMe, the everything is perceived. it’s amazing,
The following is status of lspci, lsblk, uname, dmesg, ls /dev to check if there is NVMe device on QEMU-KVM
i.e the following data is measured on GUEST OS
Kernel Version
$ uname -a
Linux localhost.localdomain 3.10.0-327.el7.x86_64 #1 SMP Thu Nov 19 22:10:57 UTC 2015 x86_64 x86_64 x86_64 GNU/Linux
$ cat /etc/centos-release
CentOS Linux release 7.2.1511 (Core)
dmesg | grep ‘nvm’
$ dmesg | grep 'nvm'
  There is nothing to print
lspci -vt
$ lspci -vt
-[0000:00]-+-00.0  Intel Corporation 440FX - 82441FX PMC [Natoma]
           +-01.0  Intel Corporation 82371SB PIIX3 ISA [Natoma/Triton II]
           +-01.1  Intel Corporation 82371SB PIIX3 IDE [Natoma/Triton II]
           +-01.3  Intel Corporation 82371AB/EB/MB PIIX4 ACPI
           +-02.0  Red Hat, Inc. QXL paravirtual graphic card
           +-03.0  Red Hat, Inc Virtio network device
           +-04.0  Intel Corporation 82801FB/FBM/FR/FW/FRW (ICH6 Family) High Definition Audio Controller
           +-05.0  Red Hat, Inc Virtio console
           +-06.0  Intel Corporation 82801I (ICH9 Family) USB UHCI Controller #1
           +-06.1  Intel Corporation 82801I (ICH9 Family) USB UHCI Controller #2
           +-06.2  Intel Corporation 82801I (ICH9 Family) USB UHCI Controller #3
           +-06.7  Intel Corporation 82801I (ICH9 Family) USB2 EHCI Controller #1
           +-07.0  Red Hat, Inc Virtio block device
           \-08.0  Red Hat, Inc Virtio memory balloon
lsblk
$ lsblk
NAME            MAJ:MIN RM  SIZE RO TYPE MOUNTPOINT
sr0              11:0    1 1024M  0 rom
vda             252:0    0   32G  0 disk
├─vda1          252:1    0  500M  0 part /boot
└─vda2          252:2    0 31.5G  0 part
  ├─centos-root 253:0    0 28.3G  0 lvm  /
  └─centos-swap 253:1    0  3.2G  0 lvm  [SWAP]
ls /dev
$ ls /dev
autofs           fd            mqueue              snapshot  tty19  tty35  tty51  ttyS1    vcsa
block            full          net                 snd       tty2   tty36  tty52  ttyS2    vcsa1
bsg              fuse          network_latency     sr0       tty20  tty37  tty53  ttyS3    vcsa2
btrfs-control    hidraw0       network_throughput  stderr    tty21  tty38  tty54  uhid     vcsa3
bus              hpet          null                stdin     tty22  tty39  tty55  uinput   vcsa4
cdrom            hugepages     nvram               stdout    tty23  tty4   tty56  urandom  vcsa5
centos           initctl       oldmem              tty       tty24  tty40  tty57  usbmon0  vcsa6
char             input         port                tty0      tty25  tty41  tty58  usbmon1  vda
console          kmsg          ppp                 tty1      tty26  tty42  tty59  usbmon2  vda1
core             log           ptmx                tty10     tty27  tty43  tty6   usbmon3  vda2
cpu              loop-control  pts                 tty11     tty28  tty44  tty60  usbmon4  vfio
cpu_dma_latency  lp0           random              tty12     tty29  tty45  tty61  vcs      vga_arbiter
crash            lp1           raw                 tty13     tty3   tty46  tty62  vcs1     vhost-net
disk             lp2           rfkill              tty14     tty30  tty47  tty63  vcs2     virtio-ports
dm-0             lp3           rtc                 tty15     tty31  tty48  tty7   vcs3     vport1p1
dm-1             mapper        rtc0                tty16     tty32  tty49  tty8   vcs4     vport1p2
dri              mcelog        sg0                 tty17     tty33  tty5   tty9   vcs5     zero
fb0              mem           shm                 tty18     tty34  tty50  ttyS0  vcs6
How to insatll and set up LightNVM on QEMU-NVMe for OpenChannelSSD on GUETOS
AS you can see getting started of Lightnvm.io

the portion of install kernel 4.4+ in getting started of LightNVM.
You can find “LightNVM is directly supported in Linux kernel 4.4+.”
So you need kernel above 4.4+ version. Fortunately, LightNVM guys manage kernel source for OpenChannleNVMe and LightNVM
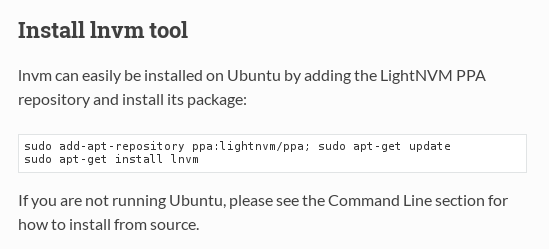
Also You need lnvm tool. as you can see the above figure.
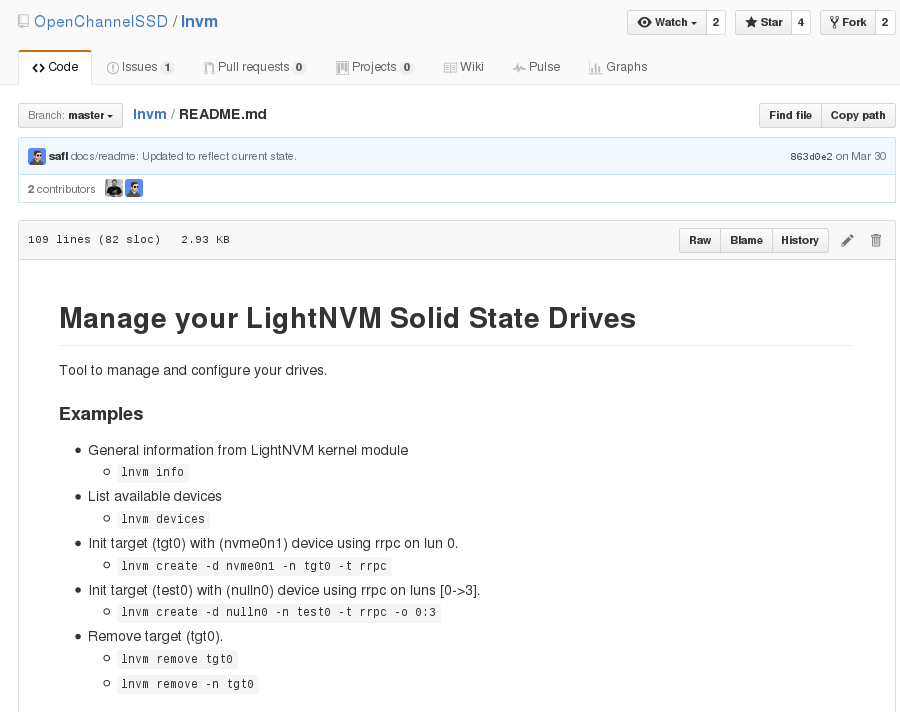
As you can see the above image. You know How to run lnvm tool. Aslo You can check how to use lnvm tool in LightNVM site’s Command Line
To sum up, lnvm tool connect among NVMe driver, generic media driver and target.
i.e you can make your own FTL like pblk and your own generic driver to fit your device(SSD).
After that, Through lnvm, You connect each other(target and media manager).
Before using the lnvm tool, you have to get sudo privilege.
From now on, let’s install and kernel complie for LightNVM and OpenChannelSSD
The newest Kernel compile on GUESTOS of QEMU-NVMe.
Also LightNVM guys manage Linux kernel support of OpenChannelSSD.
first git clone and kernel build on GuestOS
$ git clone https://github.com/OpenChannelSSD/linux.git
cd linux
cp /.config(The Original location) /.config(OpenChannelSSD’s Linux)
make olddefconfig
make -j8
sudo make modules_install
sudo make install
be careful when you choose options in menuconfig
the following is based on rrpc but currently I evaluate on pblk.
CONFIG_NVM=y
CONFIG_NVM_DEBUG=Y
CONFIG_NVM_GENNVM=y
CONFIG_NVM_RRPC=y
The above four things is the same.
BUT, I divided into two cases.
One is :
CONFIG_BLK_DEV_NULL_BLK=m
CONFIG_BLK_DEV_NVME=m
The other is :
CONFIG_BLK_DEV_NULL_BLK=m
CONFIG_BLK_DEV_NVME=y
That doesn’t matter When it comes to creating lightNVM targets and device.
If you detect a problem. I recommend you that You will install once again after erase the several file
Those files is :
bbtable.qemu & blkbme(virtual device) & meta.qemu
but if you consider symbol dependency, when you build kernel.
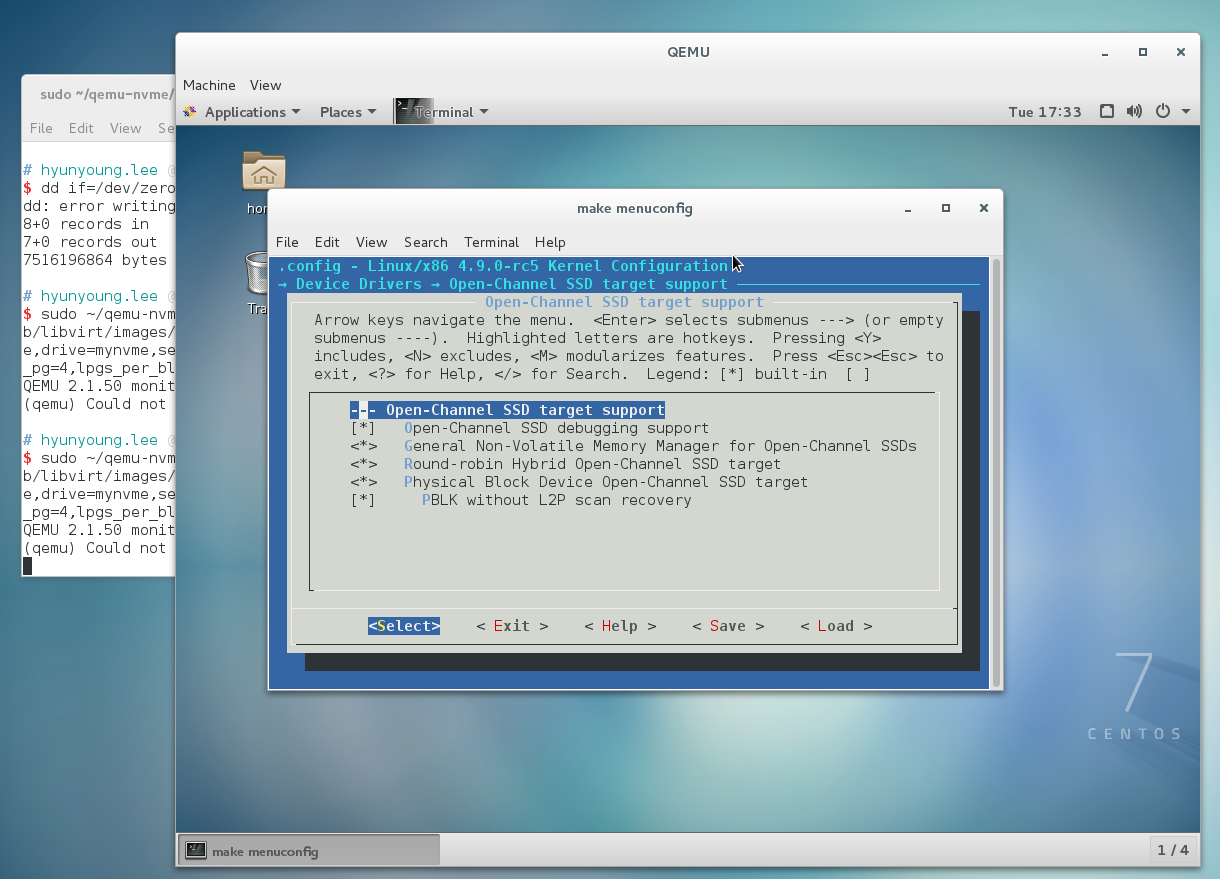
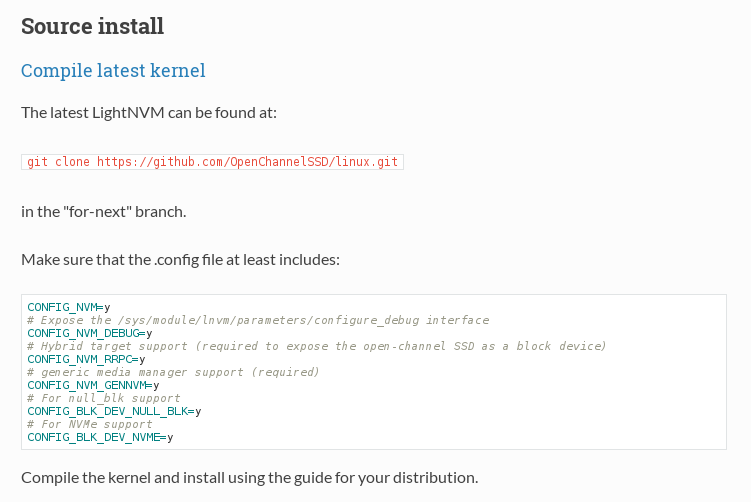
I will explain you based on pblk
CONFIG_NVM=y
# Expose the /sys/module/lnvm/parameters/configure_debug interface
CONFIG_NVM_DEBUG=y
# Target support (required to expose the open-channel SSD as a block device)
CONFIG_NVM_PBLK=y
# Do not perform recovery upon boot (Disables recovery of the mapping table upon boot. Disable when using across boots)
CONFIG_NVM_PBLK_NO_RECOV=y
# generic media manager support (required)
CONFIG_NVM_GENNVM=y
# For NVMe support
CONFIG_BLK_DEV_NVME=y
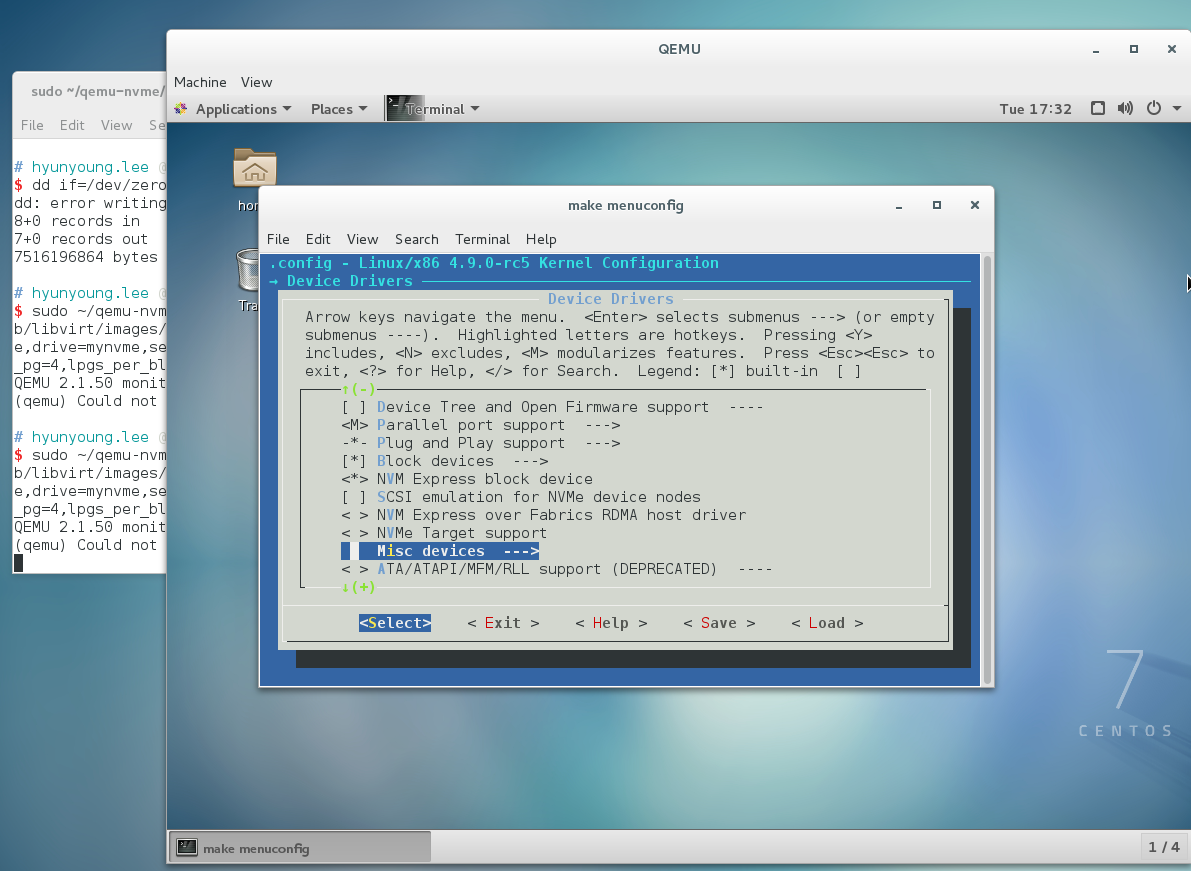
as you can see the above.
# For NVMe support CONFIG_BLK_DEV_NVME=y has dependency of symbol.
So I recommend you
in make menuconfig, Device Drivers-> NVM EXPRESS block device should be [*].
maybe if you want to check up what is different when it is done or not.
I recommend you that
you can understand olddefconfig meaning and symbol dependency.
Second usage of lnvm on GuestOS
$ git clone https://github.com/OpenChannelSSD/lnvm.git
 $ git clone https://github.com/OpenChannelSSD/lnvm.git
 Cloning into 'lnvm'...
 remote: Counting objects: 80, done.
 remote: Total 80 (delta 0), reused 0(delta 0), pack-reused 80
$ cd lnvm/
from here, the whole thing is impelemented in lnvm directory
$ ls
debian Documentation LICENSE linux lnvm.c Makefile README.md
$ make
cc -m64 -std=gnu99 -02 -g -pthread -D_GNU_SOURCE -Wall lnvm.c -lm -o lnvm
$ usdo make install
 install -d /usr/local/sbin
 install -m 755 lnvm /usr/local/sbin
When using lnvm tool, error can happen like this
$ lnvm devices
Failed to open LightNVM mgmt /dev/lightnvm/control. Error: -1
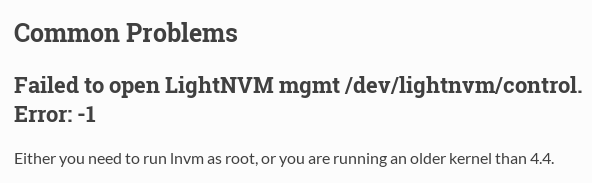
At that time, just change command like this
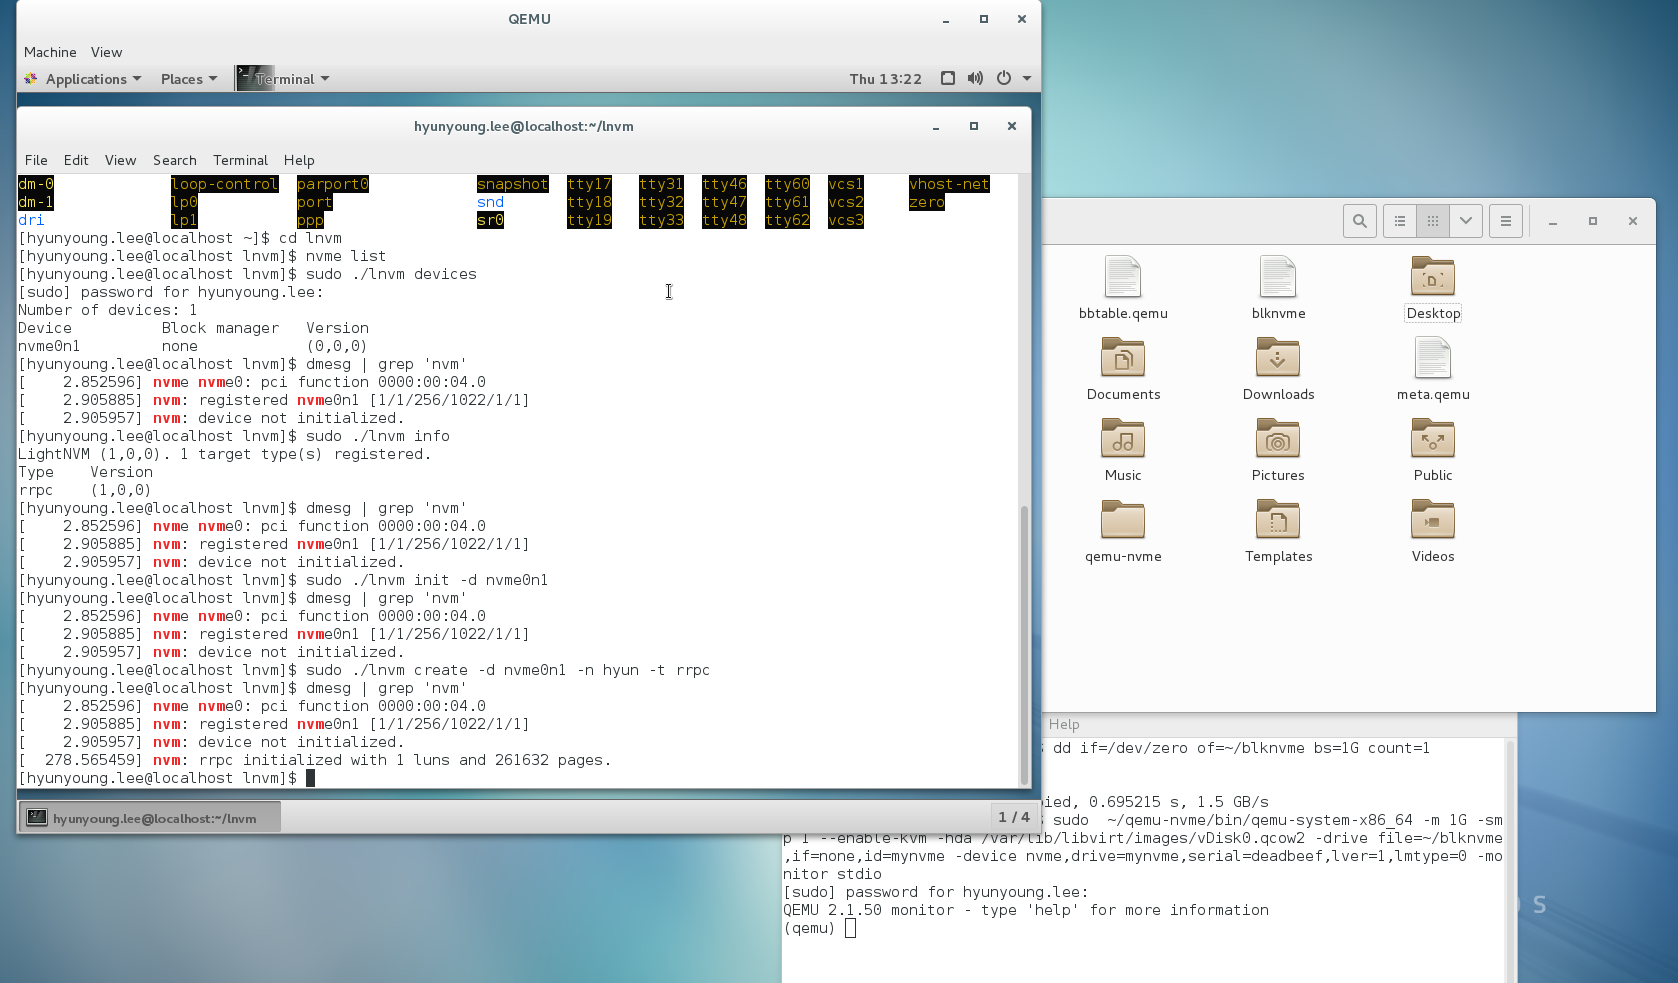
$ sudo ./lnvm devices
 Number of devices: 1
 Device     Block manager   version
 nvme0n1    none            (0,0,0)
the following is the same error and solution.
 $ lnvm info
 Failed to open LightNVM mgmt /dev/lightnvm/control. Error: -1
 $ ./lnvm info or $ ./lnvm -d init -d nvme0n1
 Failed to open LightNVM mgmt /dev/lightnvm/control. Error: -1
 $ sudo ./lnvm info
 LightNVM (1,0,0). 2 target type(s) regitstered
 Type     Version
 pblk     (1,0,0)
 rrpc     (1,0,0)
 $ lnvm init -d nvme0n1
 Failed to open LightNVM mgmt /dev/lightnvm/control. Error: -1
The followings is the final command to connect among NVMe driver, media manager and target
$ sudo ./lnvm init -d nvme0n1
$ sudo ./lnvm create -d nvme0n1 -n hyun -t rrpc (-o 0:3)
-o means the number of lnus.
if you type lsblk on command line, you can check hyun device generated on blknvme with dd command.
Be careful, when you make target and boot with QEMU-NVMe, you have to do that in directory contain blknvme that is virtual NVMe device.
So, meta.qemu and badblock table is created. when turning on kernel with QEMU-NVMe and creating target like this.
currently, you can see meta.qemu
blknvme and metat.qemu file appears.
$ ls
bbtable.qemu  blknvme  meta.qemu

Summary of installing lightNVM and compiling kernel on GUESTOS of QEMU-NVMe
On GEUST OS (Ctrl+Alt+G)
- You have to install linux for openchannelSSD
$ git clone https://github.com/OpenChannelSSD/linux.git
- After the above, You have to install kernel.
- cp /.config(The Original location) /.config(OpenChannelSSD's Linux)
- make oldconfig or olddefconfig
- make menucofig -> configuration for LihgtNVM pblk
- make -j8
- sudo make modules_install
- sudo make modules

- for lnvm
$ git clone https://github.com/OpenChannelSSD/lnvm.git
$ cd lnvm
$ make
$ sudo make install

- After completing installation of lnvm, for looking at usage
- in lnvm directory
$ sudo ./lnvm --help
$ sudo ./lnvm info
$ sudo ./lnvm devices
$ sudo ./lnvm init -d nvme0n1
$ sudo ./lnvm create -d nvme0n1 -n hyun(target name) -t pblk -o 0:3
$ sudo ./lnvm remove -n hyun(targer name)
Summary of the whole process to use lightNVM on QEMU-NVMe
as of 20161205.
On host side
- If you don't install qemu-kvm, first, You have to install that tool
$ sudo yum install -y qemu-kvm qemu-img virt-manager libvirt libvirt-python libvirt-client virt-install (virt-viewer)
$ reboot
$ virt-manager

- first you need to install Qemu-nvme
- If you already installed "Development tools", just do it as follows.
$ git clone https://github.com/OpenChannelSSD/qemu-nvme.git
$ cd qemu-nvme
$ ./configure --python=/usr/bin/python2 --enable-kvm --target-list=x86_64-softmmu --enable-linux-aio --prefix=$HOME/qemu-nvme

- At this time. You find error
- solution for that is below
$ sudo yum install -y gtk2-devel OR $ sudo yum install libaio-devel

- One more time, ./configure ~~~ . After that
$ make -j8
$ sudo make install

- if you want to use Ramdisk
$ mkdir ./ramdisk OR $ mkdir ./rootOfRamdisk
$ sudo mount -t tmpfs -o size=7G tmpfs ./ramdisk OR $ sudo mount -t tmpfs -o size=7G tmpfs ./rootOfRamdisk
$ cd ramdisk OR $ cd rootOFRamdisk

- for Qemu-nvme
$ dd if=/dev/zero of=./blknvme bs=1G count=4
$ sudo ~/qemu-nvme/bin/qemu-system-x86_64 -m 16G -smp 4 --enable-kvm -hda /var/lib/libvirt/images/vDisk.qcow2(virtual device) -drive file=./blknvme(virtual nvme),if=none,id=mynvme -device nvme,drive=mynvme,serial=deadbeef,lver=1,~~~(another option) -monitor stdio
- For example command
$ sudo ~/qemu-nvme/bin/qemu-system-x86_64 -m 16G -smp 4 --enable-kvm -hda /var/lib/libvirt/images/vDisk.qcow2 -drive file=./blknvme,if=none,id=mynvme -device nvme,drive=mynvme,serial=deadbeef,lver=1,ll2pmode=0,lnum_lun=4,lnum_pln=2,lsecs_per_pg=4,lpgs_per_blk=512 -monitor stdio
On GeustOS(Ctrl+Alt+G)
- You have to install linux for openchannelSSD
$ git clone https://github.com/OpenChannelSSD/linux.git
- After the above, You have to install kernel.
- cp /.config(The Original location) /.config(OpenChannelSSD's Linux)
- make oldconfig or olddefconfig
- make menucofig -> configuration for LihgtNVM pblk - you always have to check getting started of lighinvm to know what option is to use LightNVM and OpenChannelSSD.
- make -j8
- sudo make modules_install
- sudo make modules

- for lnvm
$ git clone https://github.com/OpenChannelSSD/lnvm.git
$ cd lnvm
$ make
$ sudo make install

- After completing installation of lnvm, for looking at usage
$ sudo ./lnvm --help
$ sudo ./lnvm info
$ sudo ./lnvm devices
$ sudo ./lnvm init -d nvme0n1
$ sudo ./lnvm create -d nvme0n1 -n hyun(target name) -t pblk -o 0:3
$ sudo ./lnvm remove -n hyun(targer name)

- Simple test with Fio
- Installation of fio

- fio options in shell script
BLOCKSIZE=4k
RW=randwrite
for REPEAT in $(seq 0 9)
do
fio --name=${BLOCKSIZE}-${RW}-${REPEAT} \
 --filename=/dev/nvme0n1 \
 --rw=randwrite \
 --bs=4096 \
 --ioengine=libaio \
 --numjobs=1 \
 --iodepth=256 \
 --direct=1 \
 --thread \
 --write_iops_log=${BLOCKSIZE}-${RW}-${REPEAT} \
 --log_avg_msec=1000 \
 --size=$((900*1024*1204)) or --size=50% or Noone
done
Reference
-
lightnvm.io - the official site of lightnvm
The following is explaining How to add NVMe device by virt-manager, the answer is you cannot use virt-manger.
Source code for openchannelSSD
Appendix A : build Kernel to latest version
AS of 20161123 below image is changed for pblk on officail site of lightNVM
In order to work on lightnvm, I need kernel above version 4.4+.**
I will install kernel version latest version
you remeber the above image is change to fit pblk on the officail site of lightNVM
In my build process
su
chmod u+w /etc/sudoers
vim /etc/sudoers
chmod u-w /etc/sudoers
sudo yum install -y gcc bc openssl-devel ncurses-devel pciutils libudev-devel
wget https://www.kernel.org/pub/linux/kernel/v4.x/linux-4.8.tar.xz
xz -cd linux-4.X.tar.xz | tar xvf -
$ cp ./Downloads/config-4.8.0-1.el7.elrepo.x86_64 ./linux-4.8/.config
$ cd linux-4.8/
(make oldconfig)
$ make menuconfig
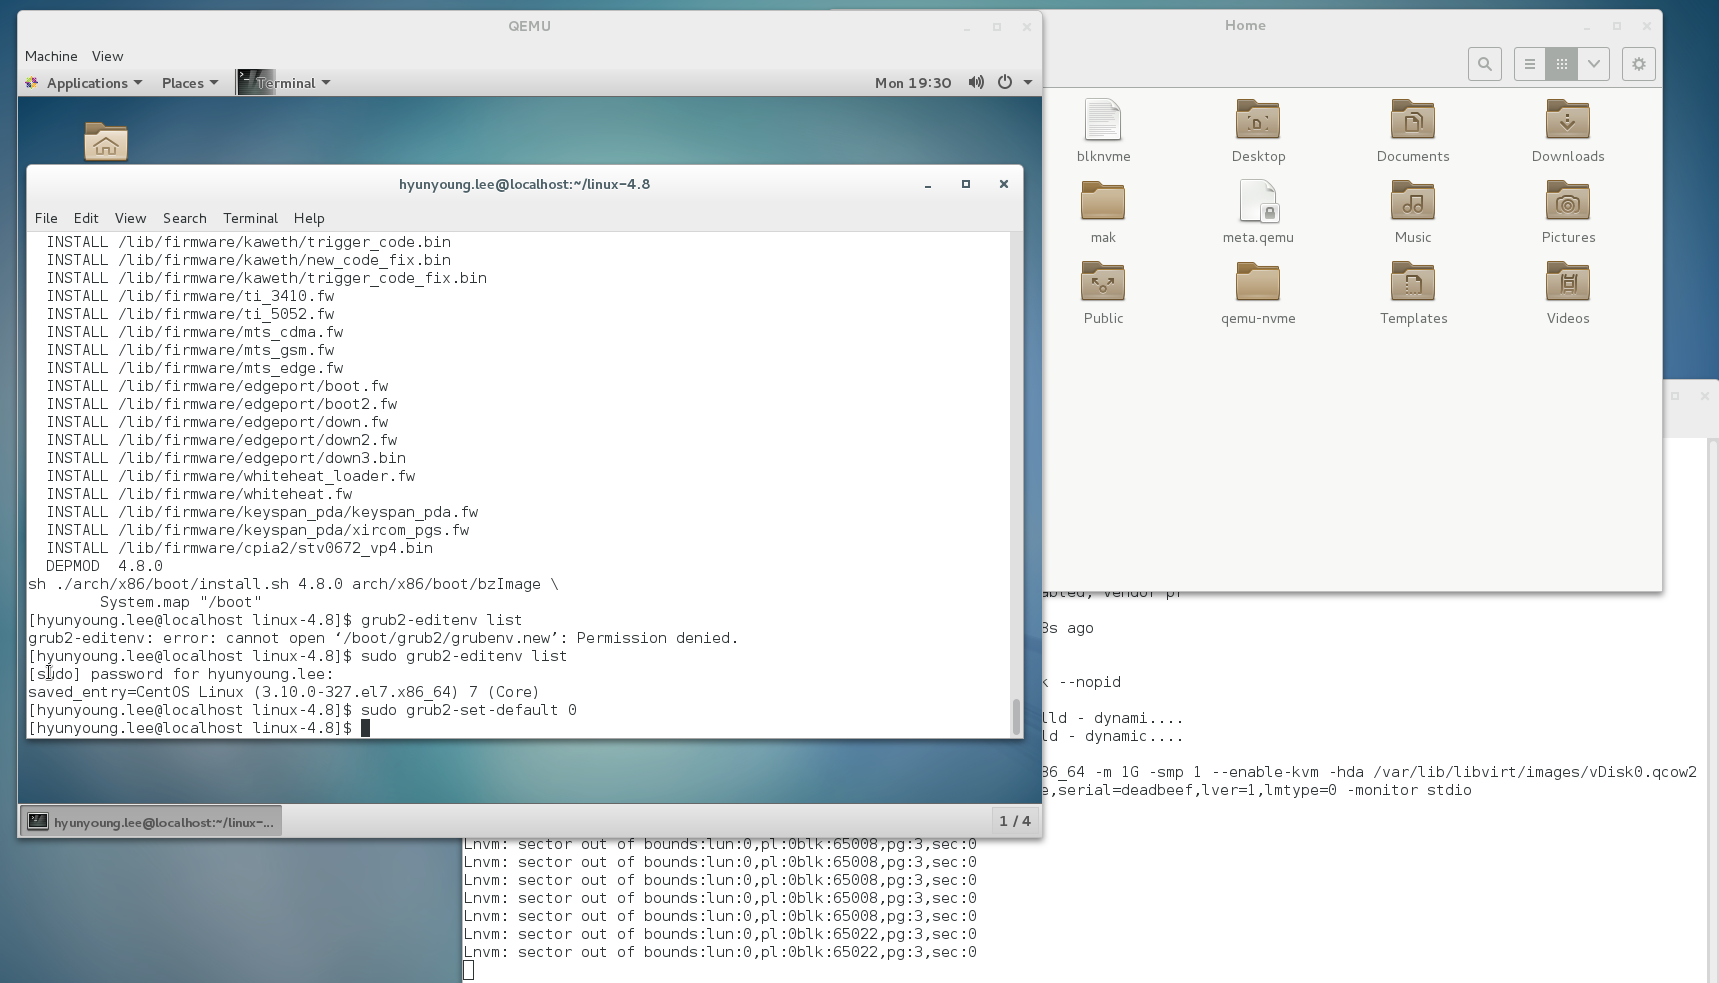
$ make
$ make modules_install install
($ grep ^menuentry /boot/grub2/grub.cfg | cut –d\’ –f2)
$ grub2-editenv list
$ grub2-set-default 0
$ sudo grep ^menuentry /boot/grub2/grub.cfg | cut –d\’ –f2
cut: you must specify a list of bytes, characters, or fields
Try 'cut --help' for more information.
[sudo] password for hyunyoung.lee:
-- configure procedure of booting kernel.
$ sudo grub2-editenv list
saved_entry=CentOS Linux (3.10.0-327.el7.x86_64) 7 (Core)
$ sudo grub2-set-default 0
kernel build to latest version with OpenchannelSSD
Appendix B
The following is build mainline kerenl of ELRepo on HostOS
$ sudo rpm --import https://www.elrepo.org/RPM-GPG-KEY-elrepo.org
$ sudo rpm -Uvh http://www.elrepo.org/elrepo-release-7.0-2.el7.elrepo.noarch.rpm
Retrieving http://www.elrepo.org/elrepo-release-7.0-2.el7.elrepo.noarch.rpm
Preparing...                          ################################# [100%]
Updating / installing...
   1:elrepo-release-7.0-2.el7.elrepo  ################################# [100%]
$ sudo yum --enablerepo=elrepo-kernel install kernel-ml
Loaded plugins: fastestmirror, langpacks
elrepo                                                   | 2.9 kB     00:00
elrepo-kernel                                            | 2.9 kB     00:00
(1/2): elrepo/primary_db                                   | 376 kB   00:00
(2/2): elrepo-kernel/primary_db                            | 1.6 MB   00:00
Loading mirror speeds from cached hostfile
 * base: centos-distro.1gservers.com
 * elrepo: elrepo.org
 * elrepo-kernel: elrepo.org
 * epel: linux.mirrors.es.net
 * extras: mirrors.usc.edu
 * updates: centos.sonn.com
Resolving Dependencies
--> Running transaction check
---> Package kernel-ml.x86_64 0:4.8.1-1.el7.elrepo will be installed
--> Finished Dependency Resolution
......

$ sudo yum --enablerepo=elrepo-kernel update
Loaded plugins: fastestmirror, langpacks
Loading mirror speeds from cached hostfile
 * base: centos-distro.1gservers.com
 * elrepo: repos.lax-noc.com
 * elrepo-kernel: repos.lax-noc.com
 * epel: mirror.prgmr.com
 * extras: mirrors.usc.edu
 * updates: centos.sonn.com
Resolving Dependencies
--> Running transaction check
---> Package python-perf.x86_64 0:3.10.0-327.36.2.el7 will be updated
---> Package python-perf.x86_64 0:4.8.1-1.el7.elrepo will be an update
--> Finished Dependency Resolution

Dependencies Resolved

================================================================================
 Package          Arch        Version                  Repository          Size
================================================================================
Updating:
 python-perf      x86_64      4.8.1-1.el7.elrepo       elrepo-kernel      443 k

Transaction Summary
================================================================================
......