Now I will install lightnvm & virtual OpenchannelSSD using QEMU-KVM and QEMU-NVMe In order words, I will use Linux virtualization to do that.
OpenChannelSSD
Now, OpenchannelSSD is open Hardware and uses Specification of NVM Express.
Hardward’s funcationality move out in SSD.
So several portions move into kernel module. that is lightNVM.
FTL, Wear-leveling, GC is moved into kernel, LightNVM module is in charge to manage this functionality.
So I want to evaluation Openchannel and LightNVM.
But I can get the actual SSD. because This protocol is launched in 2015.
I will use the QEMU-NVMe to virtualize hardware.
You can also evaluate this lightNVM.
When I installed and executed QEMU-NVMe for Openchannel, the following is what I referred to :
you can see the basic installing QEMU-NVMe from the URL below
- Opensource QEMU-NVMe supports NVMe on QEMU.
You can see how to install the dedicated QEMU-NVMe for OpenChannelSSD from the URL below
- When you evaluate Openchannel and lightnvme virtually, you will need OpenchannelSSD’s QEMU-NVMe.
QEMU-NVMe For OpenChannelSSD
I need this tool to evaluate the openChannelSSD.
Openchannel’s lightnvm guys make lightNVM work on virtual NVMe.
For example, let’s see kernel 4.9 source code.
628 /* move to shared place when used in multiple places. */
629 #define PCI_VENDOR_ID_CNEX 0x1d1d
630 #define PCI_DEVICE_ID_CNEX_WL 0x2807
631 #define PCI_DEVICE_ID_CNEX_QEMU 0x1f1f
632
633 int nvme_nvm_ns_supported(struct nvme_ns *ns, struct nvme_id_ns *id)
634 {
635         struct nvme_ctrl *ctrl = ns->ctrl;
636         /* XXX: this is poking into PCI structures from generic code! */
637         struct pci_dev *pdev = to_pci_dev(ctrl->dev);
638
639         /* QEMU NVMe simulator - PCI ID + Vendor specific bit */
640         if (pdev->vendor == PCI_VENDOR_ID_CNEX &&
641                                 pdev->device == PCI_DEVICE_ID_CNEX_QEMU &&
642                                                         id->vs[0] == 0x1)
643                 return 1;
644
645         /* CNEX Labs - PCI ID + Vendor specific bit */
646         if (pdev->vendor == PCI_VENDOR_ID_CNEX &&
647                                 pdev->device == PCI_DEVICE_ID_CNEX_WL &&
648                                                         id->vs[0] == 0x1)
649                 return 1;
650
651         return 0;
652 }
653
As you can see the above code, PCI_DEVICE_ID_CNEX_QEMU proves you can use lightNVM with virtual OpenchannelSSD on QEMU-NVMe. i.e QEMU helps make virtual NVMe to fit openchannelSSD. You can evaluate many things.
If you want to get started with OpenchannelSSD on emulator,
Please click Getting started of the official site lightnvm
First of all, I will arrange how to install the dedicated QMEU-NVMe for OpenchannelSSD.
How to install QEMU-NVMe for OpenChannelSSD : reference site - README
the original QEMU-NVMe helps me understand how to install the dedicated QEMU-NVMe for OpenchannelSSD.
here, I will arrange what I need in the original QEMU-NVMe together when I install and execute the dedicated QEMU-NVMe for OpenchhannelSSD.
Because the basic way to install and execute QEMU-NVMe is similar to each other.
-QEMU-NVME git for OpenChannelSSD
My test environment is x86_64 Architecture on CentOS 7,”ThinkServer TS140, CentOS 7”
Before installing QEMU-NVMe for OpenChannelSSD, You’d better read Getting Started of lightNVM and git of QEMU-NVMe for OpenchannelSSD
You need something to go on Intalling QEMU-NVMe for OpenChannelSSD.
that is Prerequisite.
first, Prerquisite
On the Original QEMU-NVMe site. In order to compile QEMU-NVMe.
theh recommand those packages.
For RHEL 5 Host
$ yum install kernel-devel
$ yum install zlib-devel
$ yum install SDL
$ yum install libaio-devel
But, In my case, When I install, I use that command.
- this command is what I recommend   -- this is my choice
$ sudo yum groupinstall -y "Development Tools"
$ sudo yum install -y libaio-devel
Second, git clone git repository of QEMU-NVMe for OpenChannelSSD
If you install QEMU-NVMe for OpenchannelSSD, You will have to download git repository,
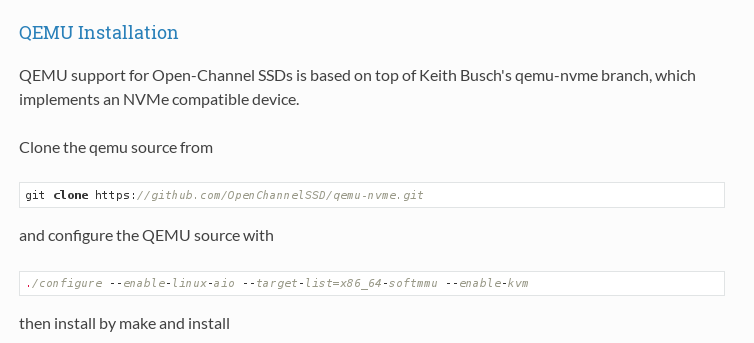
$ git clone https://github.com/OpenChannelSSD/qemu-nvme.git – this is my choice. OR
$ wget https://github.com/OpenChannelSSD/qemu-nvme/archive/master.zip
$ git clone https://github.com/OpenChannelSSD/qemu-nvme.git
Cloning into 'qemu-nvme'...
remote: Counting objects: 201724, done.
remote: Total 201724 (delta 0), reused 0 (delta 0), pack-reused 201724
Receiving objects: 100% (201724/201724), 67.26 MiB | 10.44 MiB/s, done.
Resolving deltas: 100% (161346/161346), done.
– In order to show example of “wget”
$ wget https://github.com/OpenChannelSSD/qemu-nvme/archive/master.zip
....
HTTP request sent, awaiting response... 200 OK
Length: unspecified [application/zip]
Saving to: ‘master.zip’

    [        <=>                                                                             ] 12,307,731  7.36MB/s   in 1.6s

2016-12-13 13:37:55 (7.36 MB/s) - ‘master.zip’ saved [12307731]
Here, I was wondering what the difference is between wget and git clone
Now I realized wget just download and doesn’t contain the functions of git. i.e I can download just file with zip.
But, git clone makes you use the functions of git like push, checkout and so on.
Third, Compile and Install QEMU-NVMe for OpenChannelSSD
base on QEMU-NVMe git repository’s README for OpenChannelSSD
Minimum Example
- this is my choice
$ ./configure --python=/usr/bin/python2 --enable-kvm --target-list=x86_64-softmmu --enable-linux-aio --prefix=$HOME/qemu-nvme
$ make -j8
$ sudo make install
–prefix=$HOME/qemu-nvme means the location to install.
But,
You can get another ERROR like
ERROR: glib-2.12 gthread-2.0 is required to compile QEMU
In detail error happen as follows.
$ ./configure --python=/usr/bin/python2 --enable-kvm --target-list=x86_64-softmmu --enable-linux-aio --prefix=$HOME/qemu-nvme
  ERROR: glib-2.12 gthread-2.0 is required to compile QEMU
Then, In order to resolve In ERROR: glib-2.12 gthread-2.0 is required to compile QEMU
You have to type the following.
$ sudo yum install -y gtk2-devel
I could get a hint from two sites to find the above answer
One is someones’s blog And The other one is StackoverFlow
Now, After resolving the error, type ./configure ~~ again like this.
$ ./configure –python=/usr/bin/python2 –enable-kvm –target-list=x86_64-softmmu –enable-linux-aio –prefix=$HOME/qemu-nvme
if ./configure succeeds. the rest is easy.
let’s see the rest of installation.
$ make -j8
$ sudo make install
**Be carefur, Denpending on user system environment, So if you look at error that installs something, you have to install but Normally,that is related to devel tool **
The following is a portion of ./configure ~~~
after ./cofigure ~~ , You can check your system, which one is installed and short for virtual system.
$ ./configure --python=/usr/bin/python2 --enable-kvm --target-list=x86_64-softmmu --enable-linux-aio --prefix=$HOME/qemu-nvme
Install prefix    /home/hyunyoung.lee/qemu-nvme
BIOS directory    /home/hyunyoung.lee/qemu-nvme/share/qemu
binary directory  /home/hyunyoung.lee/qemu-nvme/bin
library directory /home/hyunyoung.lee/qemu-nvme/lib
module directory  /home/hyunyoung.lee/qemu-nvme/lib/qemu
libexec directory /home/hyunyoung.lee/qemu-nvme/libexec
include directory /home/hyunyoung.lee/qemu-nvme/include
config directory  /home/hyunyoung.lee/qemu-nvme/etc
local state directory   /home/hyunyoung.lee/qemu-nvme/var
Manual directory  /home/hyunyoung.lee/qemu-nvme/share/man
ELF interp prefix /usr/gnemul/qemu-%M
Source path       /home/hyunyoung.lee/qemu-nvme
How to execute QEMU-NVMe for OpenChannelSSD
From now on this Chater, what I explain is based on HOST OS.
the above image is old version
The above image is newest version in 2016.12.13
As you can see the above images. In order to start running the QEMU-NVMe openchanalSSD.
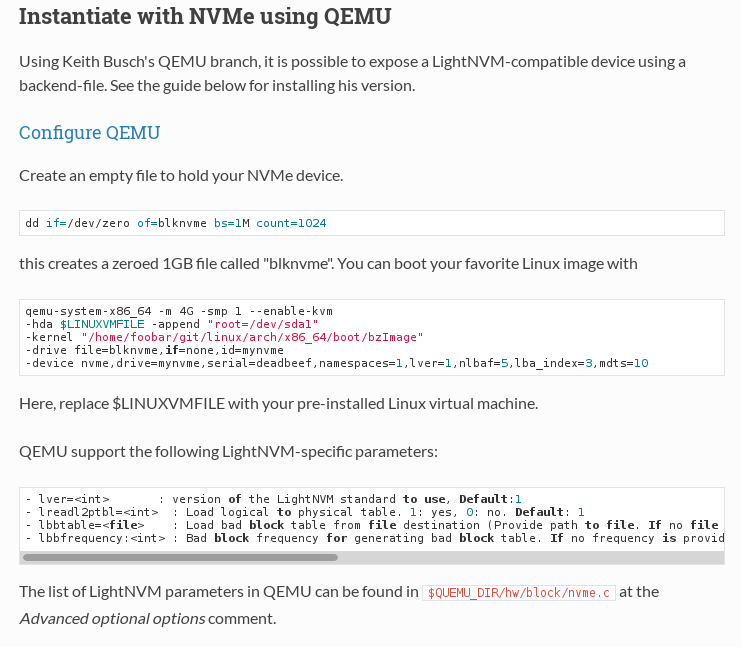
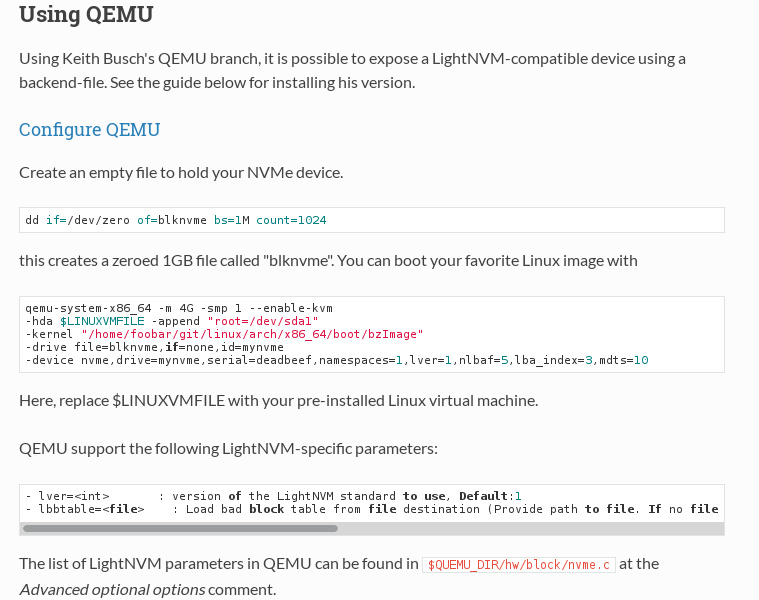
you have to create a virtual NVMe device file.
i.e First, Create an empty file to hold your NVMe device.
dd if=/dev/zero of=~/blknvme bs=1G count=1 // bs(block size)*count = the total capacity of virtual NVMe device.
with dd command, you create a virtual NVMe Device. In other words, this create a zeroded 1GB file called “blknvme”. You can boot your favorite Linux image(qcow2) with
And If you want to execute QEMU-NVMe. the instruction of execution is :
qeum-system-x86_64 -m 4G -smp 1 –enable-kvm \
-had $LINUXVMFILE -append “root=/dev/sda1” \
-kernel “/home/foobar/git/linux/arch/x86_64/boot/bzImage” \
-drive file=blknvme, if=none, id=mynvme \
-device nvme, drive=mynvme,serial=deadbeef,namespace=1,lver=1,nlbaf=5,lba_index=3,mdts=10
Here, replace $LINUXVMFILE with your pre-installed Linux virtual machine.
i.e, virtual machine file(hard file-qcow2) is made with virt-manager of QEMU-KVM
**QEMU supports the following LightNVM-specific parameters :
-- this is old version
   -lver=<int>     : version of the lightNVM standard to use, **Default**:1
   -lreadl2ptbl=<int> : Load logicl to physical table. 1: yes, 0: no, **Default**:1
   -lbbtable=<**file**>   : Load bad block table from **file** destination (provide path to **file**, if no file is provided a bad block table will be generated. Look at lbbfreqeuncy. **Default : NULL** (no **file**)
   -lbbfreqeuncy:<int>     : Bad block frequency for generating bad block table. If no frequency is provided **LNvM_DEFAULT_BB_FREQ** will be used.

-- the following is the newest one.
- lver=<int>       : version of the LightNVM standard to use, Default:1
- lbbtable=<file>    : Load bad block table from file destination (Provide path to file. If no file is provided a bad block table will be generation. Look at lbbfrequency. Default: Null (no file).
You can found the list of LightNVM parameters in QEMU can be found in $QUEMU_DIR/hw/block/nvme.c at the Advanced optional options comment.
The above content is contained in using-qemu of getting started of the official lightnvm site
BUT I followed the way to explain how to configure NVMe device in QEMU-NVMe for OpenChannelSSD.
Also you can see the list of configuration of NVMe device on qemu-navme/hw/block/nvme.c
the following is example Based on QEMU-NVMe’s READMD of OpenChnnelSSD
Example :
-drive file=/home//blk_nvme_device,if=none,id=lightnvme -device
nvme,drive=lightnvme,serial=deadbeef,lver=1,lmtype=0,lba_index=3,nlbaf=5,lchannels=1,namespaces=1
This is my choices to execute QEMU-NVMe, i.e The following is my choice to execute QEMU-NVMe
But you have to use virt-manager to create vDisk.qcow2 that installed CentOS7.iso file
So vDisk.qcow2 contains Geust OS.
There is two ways, One is using “$LINUXVMFILE=/var/lib/libvirt/images/vDisk0.qcow2”
The other one is not using “$LINUXVMFILE=/var/lib/libvirt/images/vDisk0.qcow2”
$ dd if=/dev/zero of=~/blknvme bs=2G count=1
$ dd if=/dev/zero of=~/blknvme bs=2G count=1
0+1 records in
0+1 records out
2147479552 bytes (2.1 GB) copied, 3.17565 s, 676 MB/s

- In order to check if that directory has vDisk.qcow2 that is virtual machine which has linux booting image.
# pwd
/var/lib/libvirt/images
# ls
vDisk0.qcow2
$ LINUXVMFILE=/var/lib/libvirt/images/vDisk0.qcow2
One is using “$LINUXVMFILE=/var/lib/libvirt/images/vDisk0.qcow2”
   $ ~/qemu-nvme/bin/qemu-system-x86_64 -m 1G -smp 1 --enable-kvm \
-hda $LINUXVMFILE \
-drive file=~/blknvme,if=none,id=mynvme \
-device nvme,drive=mynvme,serial=deadbeef,lver=1,lmtype=0 \
-monitor stdio
The other one is not using “$LINUXVMFILE=/var/lib/libvirt/images/vDisk0.qcow2”
  $ ~/qemu-nvme/bin/qemu-system-x86_64 -m 1G -smp 1 --enable-kvm \
-hda /var/lib/libvirt/images/vDisk0.qcow2 \
-drive file=~/blknvme,if=none,id=mynvme \
-device nvme,drive=mynvme,serial=deadbeef,lver=1,lmtype=0 \
-monitor stdio
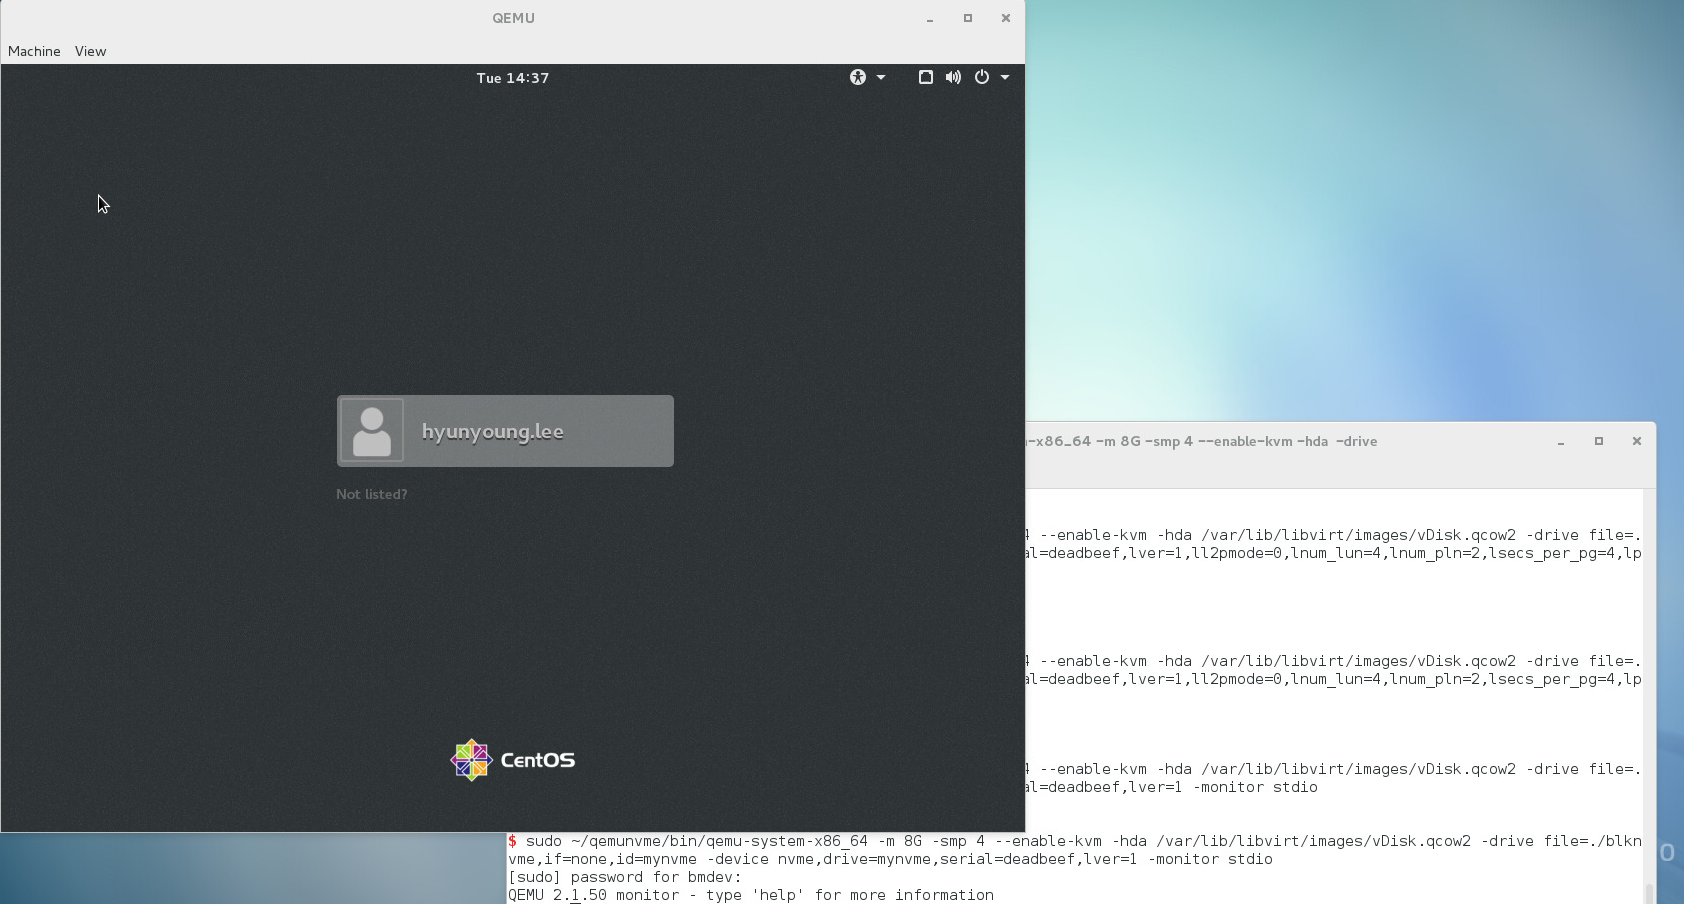
the following is image when you execute QEMU-NVMe correctly.
Summary of the entire process installing.
This process is implemented on HOST OS.
- download QEMU_NVMe for OpenChannelSSD
$ git clone https://github.com/OpenChannelSSD/qemu-nvme.git
- In order to install QEMU-NVMe
$ ./configure --python=/usr/bin/python2 --enable-kvm --target-list=x86_64-softmmu --enable-linux-aio --prefix=$HOME/qemu-nvme

- At this time, if error happen
- libaio :
$ yum install libaio-devel
- glib-2.12 gthread-2.0 :
$ sudo yum install -y gtk2-devel

$ make -j8
$ sudo make install

- creat a virtual NVMe device
$ dd if=/dev/zero of=~/blknvme bs=2G count=1 // bs*count is the total size of NVMe device.

- under creating vDisk.qcow2 containing virtual machine that is including linux booting image.
- If you want to know how to install GuestOS with vDisk.qcow2, click [my blog's QEMU - URL]()

- NVMe basic setting. - my final executing command of QEMU-NVMe
$ ~/qemu-nvme/bin/qemu-system-x86_64 -m 1G -smp 1 --enable-kvm \
-hda /var/lib/libvirt/images/vDisk0.qcow2 \
-drive file=~/blknvme,if=none,id=mynvme \
-device nvme,drive=mynvme,serial=deadbeef,lver=1 \
-monitor stdio
later on, it is okay that I ignore the following, a littl changing setting of ./configure for verification.
Normally, if you follow the above command that is my choice. You can use NVMe.
- it is just adding --enable-gtk --enable-spice.
$ ./configure --python=/usr/bin/python2 --enable-kvm --target-list=x86_64-softmmu --enable-linux-aio --prefix=$HOME/qemu-nvme --enable-gtk --enable-spice
$ make -j8
$ make install

- for test, there is no meaning
- display option test

$ dd if=/dev/zero of=~/blknvme bs=1G count=1
$ LINUXVMFILE=/var/lib/libvirt/images/centos7.img
$ LINUXVMFILE=/var/lib/libvirt/images/centos7.qcow2
$ sudo ~/qemu-nvme/bin/qemu-system-x86_64 -m 1G -smp 1 --enable-kvm \
-hda /var/lib/libvirt/images/centos7.img \
-drive file=~/blknvme,if=none,id=mynvme \
-device nvme,drive=mynvme,serial=deadbeef,lver=1,lmtype=0,lba_index=3,nlbaf=5,lnum_ch=1,namespaces=1 \
-monitor stdio -display gtk
Reference
LightNVM’s officail site
-
$QUEMU_DIR/hw/block/nvme.c - for setting environment of OpenChannel and LightNVM
for your infomation, why i have to use QEMU-NVMe for openchannelSSD to evaluate Openchannel and lightnvm.
If you wan to know how to execute the dedicated QEMU-NVMe for OpenChannelSSD, I recommend the following two sites.
In ./configure ~~~ , so as to resolving the error
about code of KVM
Appendix A
For your infromation, in wikipedia’s NVM Express, they are saying NVMe is supported by QEMU since version 1.6 released on August 15, 2013
Also You can check changelog of official QEMU site
But In my case, I will not run NVMe with QEMU, i will Just use opensource QEMU-NVMe.
In my case, I want to know how to install and what the neccesity is to install QEMU-NVMe On CentOS 7.
Here is Git repository of QEMU-NVMe.