Some feature is needed to use the evironment of Virtualiztion and emulator.
The Following article introduces yout about QEMU(generic and open source machine adn virtualizer)
I think you need to know Hypervisor and KVM Befor seeing the QEMU.
Hypervisor
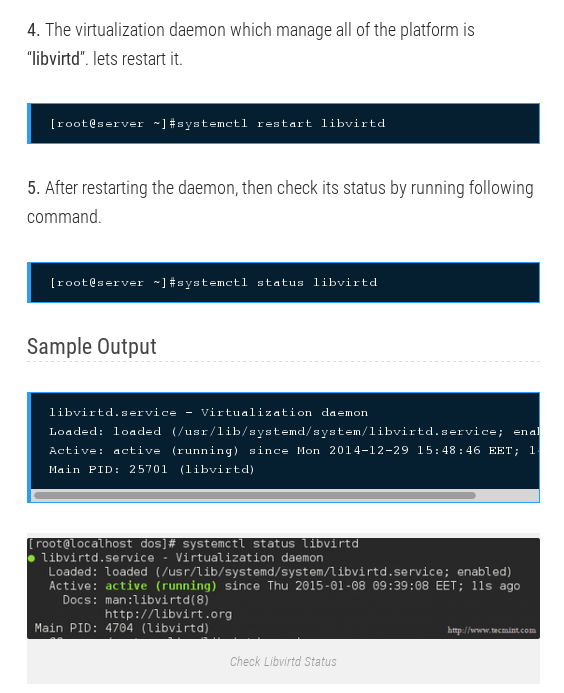
A hypervisor or virtual machine monitor(VMM) is a piece of of computer software, firmware or hardware that creates and runs virtual machines.
A computer on which a hypervisor runs one or more virtual machines is called a host machine, and each virtual machine is called a gues machine.
The hypervisor presents the guest operating systems with a virtual operating platform and manages the execution of the guest operating systems. Mutiple instances of a variety of operating systems may share the virtualized hardware resources :
For example, Linux, windows, And OS x instances can all run on a single physical x86 Machine. This Contrasts with operating-system-level-virtualization, where all instances (usually called containers) must share a single kernel, though the guest operating systems can differ in user space.
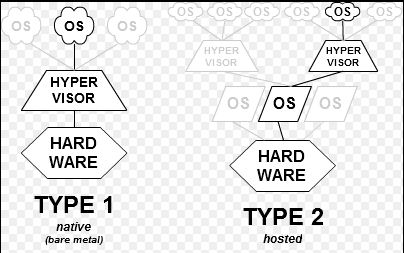
As you can see the above figure, hypervisor has two types.
Type-1, native or bare-metal hypervisors.
These hypervisors run directly on the host’s hardware to control the hardware and to manage guest operating systems. For this reason, they are sometimes called bare metal hypervisors.
Type-2 or hosted hypervisors.
These hypervisors run on a conventional operating system just as other computer programs do, A guest operating system runs as a process on the host. Type-2 hypervisors abstract guest operating systems from the host operating system.
QEMU is example of type-2 hypervisors.
If you want to know about hypervisor in detail. I recommend you wikipedia’s hypervisor
KVM, what is the KVM
KVM (Kernel-based Virtual Machine) is a virtualization infrastructure for the Linux kernel that turn it into a a hypervisor.
But, KVM requires a processor with hardware virtualization extexsions.

By itself, KVM does not perform any emulation, Instead, It exposes the /dev/kvm interface, which a user space host can then use to :
- Set up the quest VM's address space. the host must also supply a firmware image (usually a custom BIOS when emulating PCs) that the gues can use to bootstrap into its main OS.

- Feed the guest simulated I/O.

- Map the guest's video display Back onto the host.
On Linux, QMEU versions 0.10.1 and later is one such userspace host. QEMU uses KVM When available to vitualize guest at near-native speeds, but otheriwse falls back to software-only emulation.
And according to the official QEMU site’s KVM explanation,
KVM (Kernel Virtual Machine) is a Linux kernel module that allows a user space program to utilize the hardware virtualization feature of various processors.
Also QEMU can make use of KVM when running a target architecture that is the same as the host architecture. For instance, When runnig qemu-system-x86 on an x86 compatible processor, You can take advantage of the KVM acceleration that gives you benefit for your host and your guest system.
If you want to know if your CUP support KVM, type as follows.
$ egrep '(vmx|svm)' /proc/cpuinfo OR $ grep -e 'vmx' /proc/cpuinfo
- If you see result of the grep command with linenumber. type like
$ grep -nri "vmx" /proc/cpuinfo
On My CentOS 7 and x86 system

QEMU
reference : The Official QEMU site, WikiBooks’s QEMU
QEMU is a generic and open source machine emulator and virtualizer.
When used as a machine emulator, QEMU can run OSes and programs made for one machine (e.g.an ARM board) on a different machine (e.g. your own PC). By using dynamic translation, it achieves very good performance.
When used as a virtualizer, QEMU achieves near native performance by executing the guest code directly on the host CPU, QEMU supports virtualization when executing under The Xen hypervisor or using the KVM kernel module in Linux
How to Install QEMU
my environment of installing QEMU is CentOS 7. On the Centos 7, Normally, When you install the QEMU, You can use source code from officail git repository.
If you want to know process of installing QEMU from git repository and how to set QEMU on a couple of host enviromnets, I recommand Documentation/GettingStartedDevelopers of QEMU wiki.
But, If your operating system is Centos 7(Linux), I recommand QEMU wiki’s host linux
But From now on, I will explain to you how to start QEMU with GUI
Especially, with QEMU-KVM On CentOS 7, As you can see this Wikibooks’s Installing QEMU-KVM,
QEMU by itself isn’t very fast, as it does a lot of emulation even when running on the hardware compatible with the guest operating system.
How to install QEMU-KVM
From now on, I will install QEMU-KVM on CentOS 7.
Let’s start the installation of QEMU-KVM on CentOS 7.
KVM stands for Kernel Based Virtual Machine, is a virtualiztion software whicj provides ability to run a multiple guest operating systems with the help of hardware virtualization extensions. It supports wide variety of geust operating system’s such as Linux, Windows, Solaris, Haiku, REACT OS and much more.
KVM can be managed using command line or available graphical tool. Virt-Manager ( Virtual Manchine Manager ) is used to manage KVM based virtual machines.
Be aware of the following that explain virt,”Open Source API”
for virt-manager, virsh, OpenStack, Ovirt, if you want to konw more, please use libvirt and another libvirt site.
libvirt is an open source API, deamon and management tool for managing platform virtualization, It can be used to manage KVM, Xen, VMware ESX, QEMU and other virtauliztion Thechnologies.

Pre-requisites Befor installing QEMU-KVM
As said earlier, KVM will appear only if the CPU has a support of hardware virtualization, either Inter VT or AMD-V.
So If You want to find whether your CPU supports VT features, run the following command.
What is the /proc/cpuinfo ?
If you want to know, Click What is the /proc/cpuinfo?
To sum up the above site, /proc/cpuinfo means this virtual file identifies the type of processor used by your system
The site that I refer to for installing QEMU-KVM say as follows
$ egrep ‘(vmx svm)’ /proc/cpuinfo
But, In my case,
$ grep -e ‘vmx’ /proc/cpuinfo
If you issue the above command, you can check if your hardware support Virtual Enxtension with other information.
Install QEMU-KVM
Please issue tha following command to install latest qemu package and also virt-manager which provides graphical interface to manage virtual machines.
$ sudo yum install qemu-kvm qemu-img virt-manager libvirt libvirt-python libvirt-client virt-install virt-viewer
  **qemu-kvm** means QEMU emulator
  **qemu-img** means QEMU disk image manager
  **vir-install** means Command line tool to create virtual machines.
  **libvirt-client** means providing client side API's for accessing servers and also provides virsh utility which provides command line tool to manage virtual machines.
  **virt-viewer** means Graphical console.  --> I think if you don't install this tool. virt-mangaer will work.
After you install the above things, You can use virt-manager(QEMU-KVM graphic tool),and command tool together
I will summarize two ways to install QEMU-KVM.
Creating Virtual Machine
Once You have installed QEMU-KVM and other tools, it is all set to start creating virtual machines. We will be looking at creating virtual machines in both command line and graphical mode.
Command Line Mode
virt-install is used to create virtual machines using command line, this command needs multiple inputs from us to create a virtual machine such as CPU, Memory, Disk, network, Installation media location, os variant and more.
For example of command line,
$ sudo virt-install –name=itzgeekguest –ram=1024 –vcpus=1 –cdrom=/tmp/CentOS-6.5-x86_64-minimal.iso –os-type=linux –os-variant=rhel6 –network bridge=br0 –graphics=spice –disk path=/var/lib/libvirt/images/itzgeekguest.dsk,size=4
The above command uses bridged networking “br0” for allowing virtual machines to communicate with outside network, you can find a tutorial on creating bridged networking with virt Manager.
   -**name** means Name of the virtual Machine.
   -**ram** means Memory size in MB
   -**vcpus** means virtal cpu's in numbers
   -**cdrom** means Location of the ISO image.
   -**os-type** means OS type like Linux, Windows and Unix
   -**os-variant** means OS variant like rhel 6, solaris
   -**networking** means Networking
   -**graphics** means Guest display settings
   -**disk path** means Location of the disk with size of 4GB
I will finish using command line, Becaue I will use Graphic tool, virt-manager.
But, remember the above way, If you evaluation OpenChannelSSD with QEMU-NVMe. it’s similiar.
From now on, I will use graphic mode for executing QEMU-KVM with virt-manager tool.
If you use QEMU, I wish you execute QEMU-KVM with GUI than command Line.
Graphical Line Mode,
At first, You have to insatll tools for executing QEMU-KVM as I do with command Line
$ sudo yum install -y qemu-kvm qemu-img virt-manager libvirt libvirt-python libvirt-client virt-install (virt-viewer)
though you don’t install virt-viewer, virt-manager works. but in detail, I don’t know what is wrong
Now, In order to execute CUI mode of QEMU-KVM
$ sudo virt-manager
OR, search for Virtual Machine Manager like this
Application -> System Tools -> Virtual Machine Manager
The above command means executing virt-manager to manage virtualization of hardware.
Now, you can get GUI to control QEMU-KVM from installation to setting of Virtual Hardware.
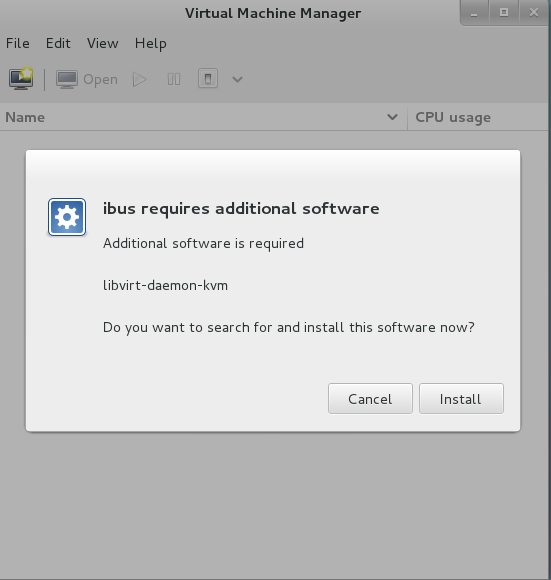
Even if you foget to install tools to need to use QEMU-KVM, After executing Virt-Manager. You get help like this
OR

if you are in the above situation, don’t get afraid !, press button to install
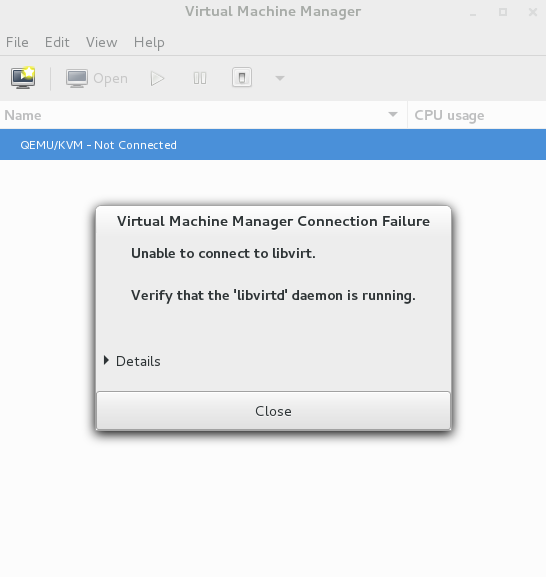
Be careful, Befor executing your Virt-Manage tool like this
BUT, If you don’t check to verify the ‘libvirtd’ daemon is running, you can get the below pictures.
The following is after pressing the install button.
Anotere careful point
If you don’t check to verify the ‘libvirtd’ daemon is running, you can get the below pictures.
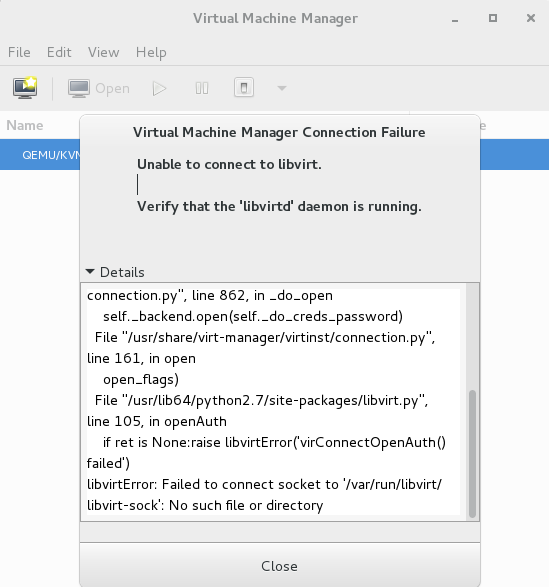
And If you want to check if the above thing is true, You can check the status of ‘libvirtd’ daemon with “systemctl” command.
$ systemctl status libvirtd OR $ service libvirtd status

let’s run libvirtd daemon!
The simplest method is rebooting, after rebooting, libvirtd daemon automatically works.
But, If you want to reboot system. you have to use systemctl command. # reference,”Tecmint”. of resolving this problem.
As you can see the tecmint blog, I got a hint to resolve that problem that “libvirtd” daemon doesn’t work.
The following is a portion of the temint blog
But, Normally, I often use rebooting, this is so comportable.
if you don’t like rebooting your system, just do like this :
$ sudo systemctl restart libvird
After typing the above command, You can check status of libvirtd with systemctl status libvirtd
systemctl status libvirtd == service libvirtd status, I could get this from StakExchange
$ service libvirtd status
But When you resolve the libvird daemon problem.
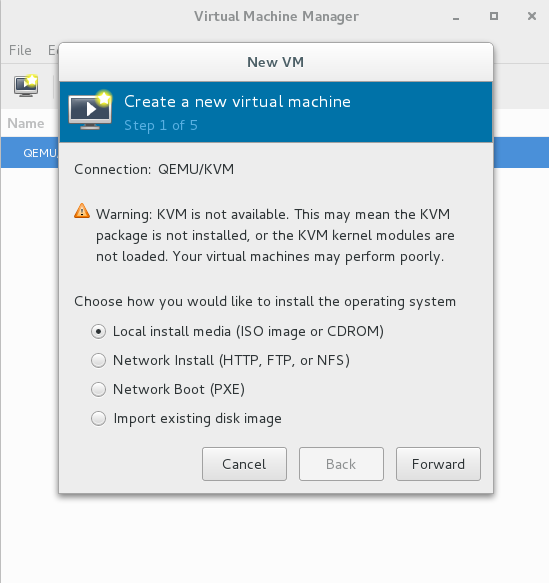
Another problem can happen with warning like this.
Waring : KVM is not available. THis may mean the KVM package is not installed, or the KVM kernel modules are not loaded, Your virtual machines may perform poorly.
In order to resolve this warning, I need to know KVM definition with status of my system (CentOS 7,Whether CPU is Inter or AMD). And I get a hint from tecmint site like this.
So I will try to type lsmod | grep kvm command on CentOS 7
$ lsmod | grep ‘kvm’
you can find what problem is, after typing the above command like

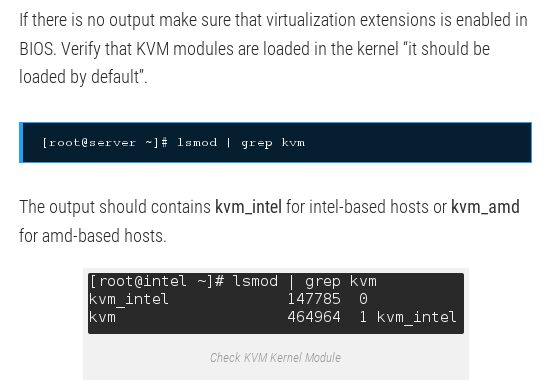
After seeing the above image, you will be able to understand meaning of lsmod | grep ‘kvm’.
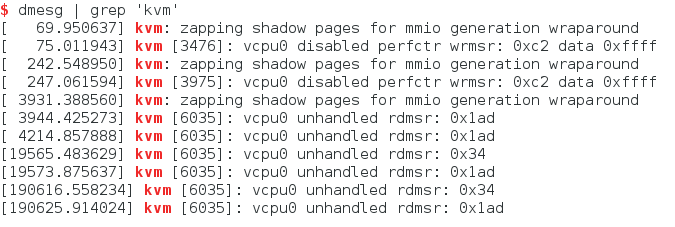
please type like this
$ dmesg | grep ‘kvm’
You will get result like this.

As you can check kernel message, KVM is disabled by bios, i.e I cannot use acceleration of Hardware Virtualization of CPU.
Then, How do I do to use acceleration of hardware virtualization of CPU, Enabling Intel(R) VT and AMD-v virtualization hardware extenstions of Centos.org is hint
that way is that after you enter the System’s BIOS Menu, In my ThinkServer, In order to Enter BIOS menu, I have to press F1 as soon as I boot my system.
And I moved menu and turn on The advanced -> CPU Setup -> Enable Intel(R) Virtualization Technology
After turning on Enable Intel(R) Virtualization Technology, here If you turn on that once, from the time, that lasts
please reboot your system with dmesg | grep ‘kvm’ OR lsmod | grep ‘kvm’ like this.
$ dmesg | grep ‘kvm’ OR $ lsmod | grep ‘kvm’

after dmesg | grep ‘kvm’ as soon as I reboot my system, there is no log with dmesg.
but If you use the QEMU-KVM, you can check the following.
Now you can start “virt-manager” tool without error when staring virt-manager.

You can create a new Virtual Machine like this.
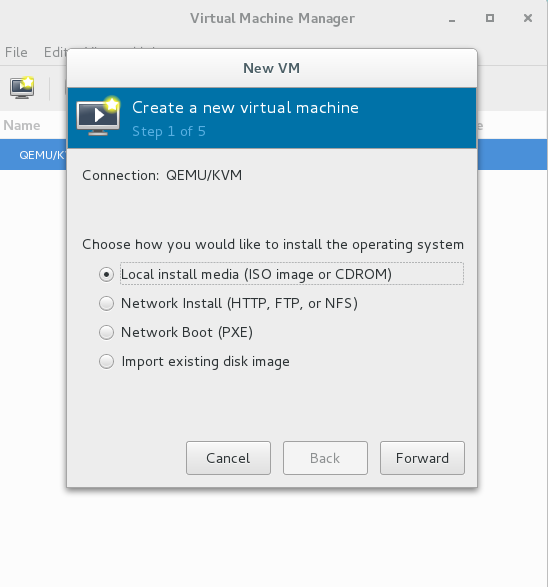
Be careful,
During the whole process of installing QEMU-KVM, I don’t implement one thing that tecmint explains
That is :
setenforce 0
This is about Selinux. even if you don’t implement this about Selinux, you can execute QEMU-KVM and mount GeustOS on QEMU-KVM.
Because you will ignore the Selinux with sudo privilege.
In my case, I’ve implemented with sudo privilege. For example When typing ‘systemctl restart libvirtd’
Later on, if problems happens. I will have to fix this.
The following is picture that tecmint explaining about Selinux.

if you want know about selinux more in detail, Selinux of Centos.org
Installation of CentOS 7 as GuestOS on QEMU-KVM
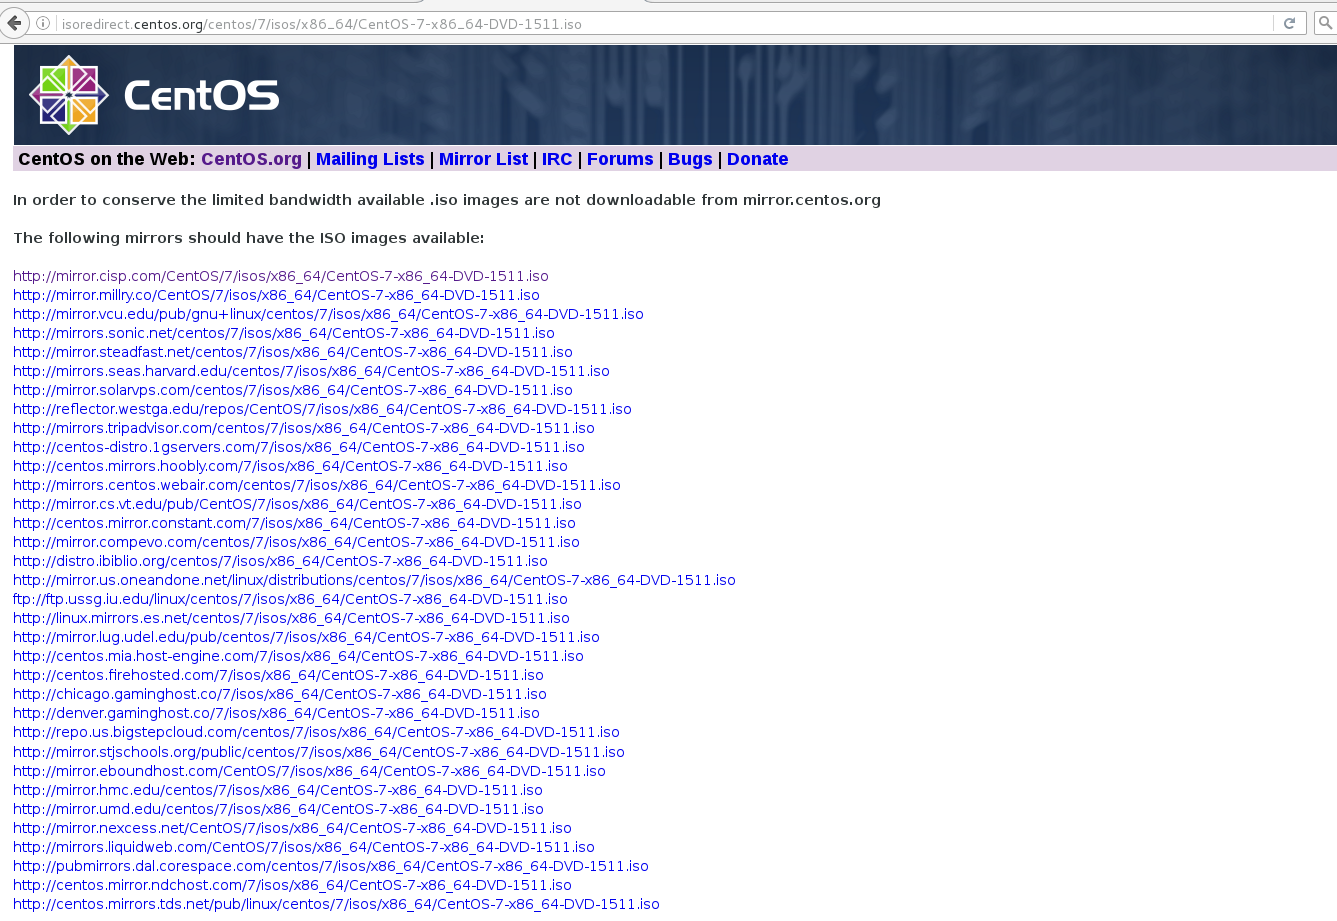
In my case, I will install GeustOS with CentOS 7.iso file form CentOS.org
Fist of all, you have to have Centos7.iso file.
So if you don’t have CentOS7.iso file, get downloaded from http://centos.org/
After downloading CentOS.iso file from https://www.CentOS.org/ in Download of Centos
Now let’s turn on virt-manager
$ virt-manager
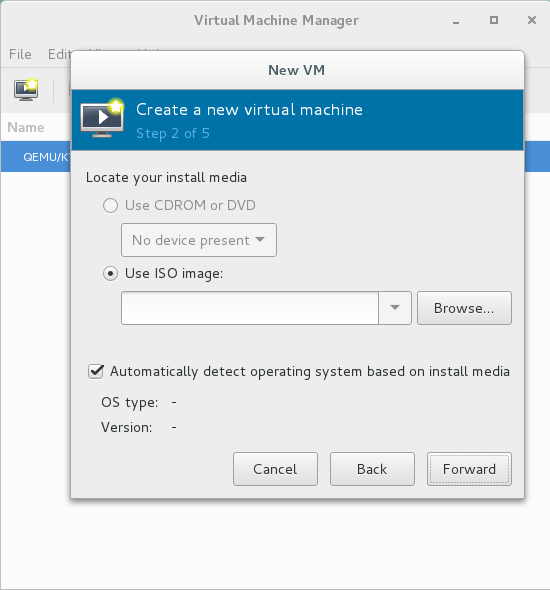
Press ‘Create a new Virtual Machine’
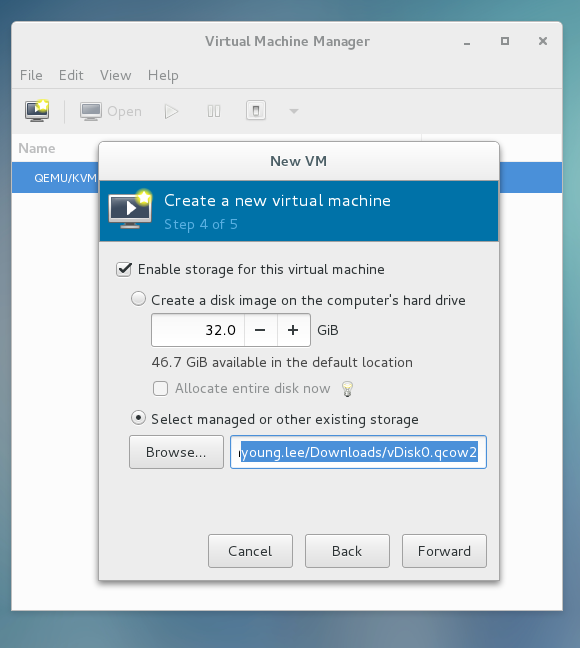
Second of all, Make and Choose virtaul hard disk(booting disk) GuestOS can recognize as a real hard disk
There are two ways to make and choose virtual. for informatin of installation, refer to Step 2: Create VMs using KVM of tecmint
At first, create the virtual hard disk before installing GestOS (pressing ‘Create a new virtual machine’)
default location : /var/lib/libvrit/images
Create the virtual hard disk GuestOS recognizes as the real hard disk.
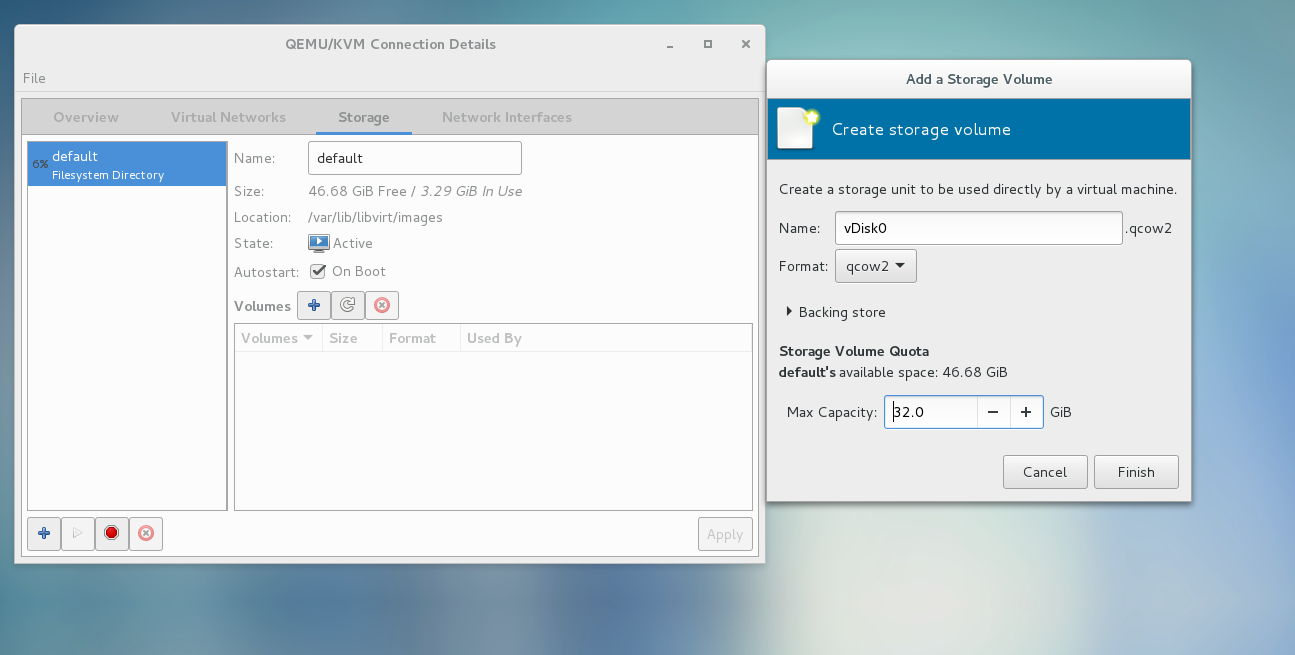
After pressing finish button on the screen. in my case vDiks0.qcow2

When you look for Centos 7.iso file, You can see the virtual hard disk I made at first

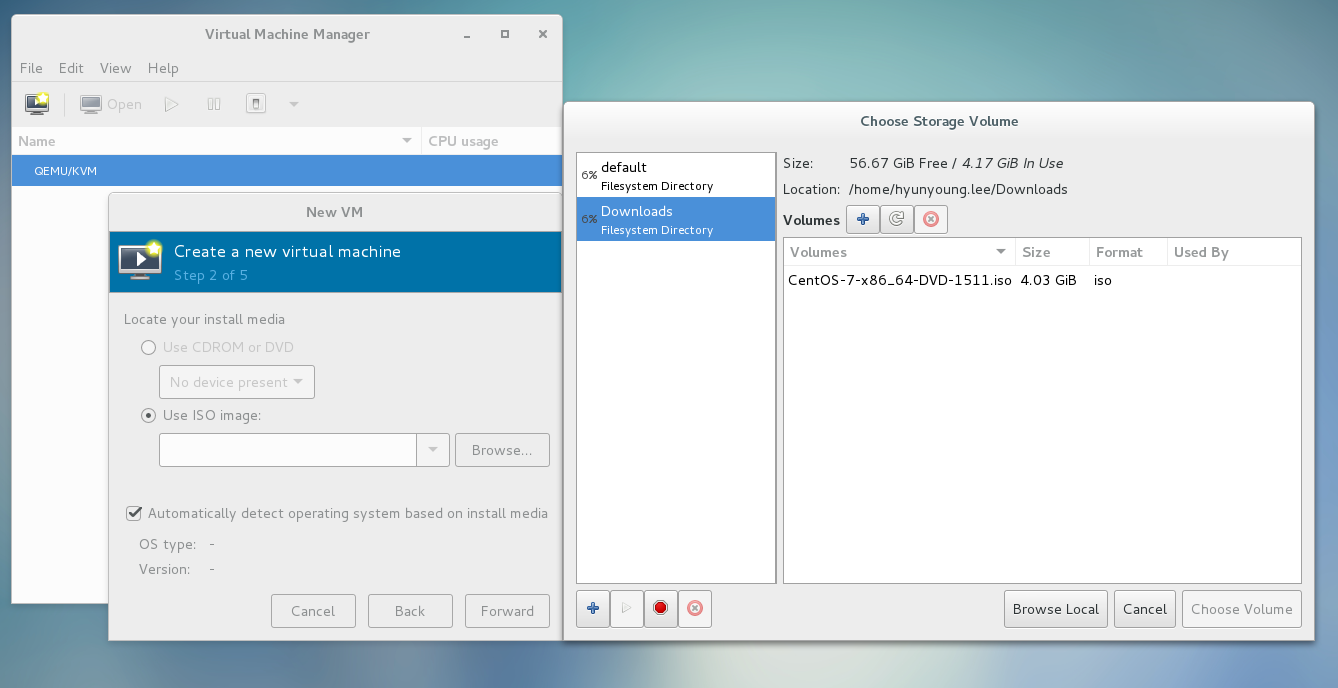
Another way to make virtual Disk.
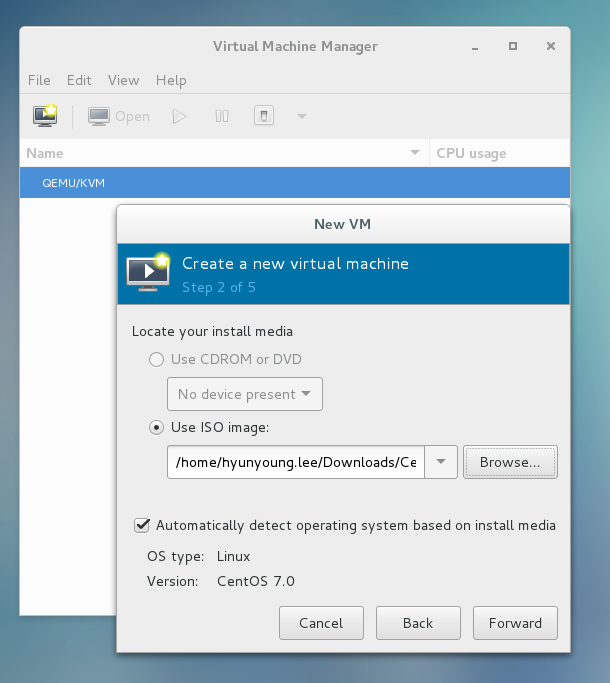
When choosing the CentOS 7.iso file, You can make virtual disk.
i.e When you look for the Centos 7.iso file, you can create the virtual hard disk that GuestOS recognize as the real hard disk
Press the Browse button for selecting ISO imange
In here, you can make another the virtual disk
Just press ‘create new volume’
In my case, the location of Virtual disk is /home/UserID/Dwonloads
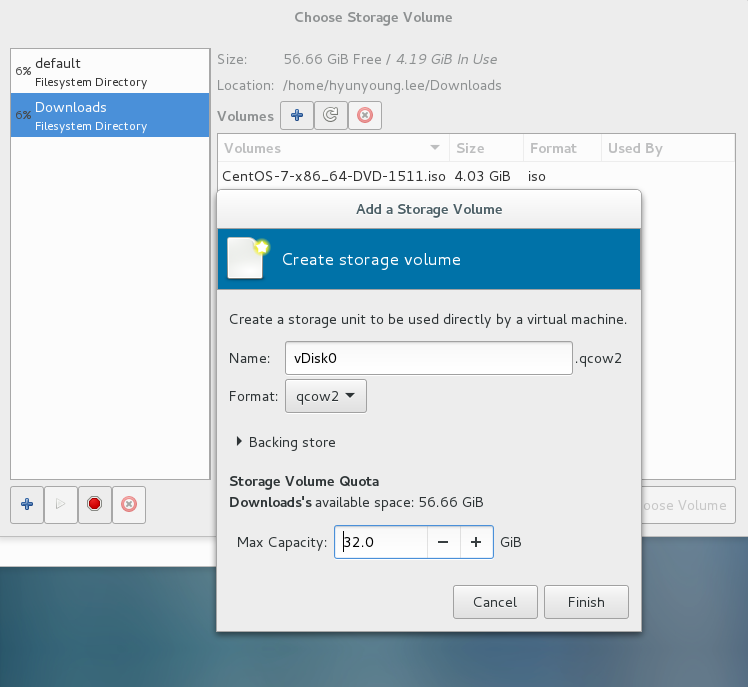
both of ways to make virtual disk, they have no difference, just depending on your choice.
Third of all, looking for CentOS 7.iso file
find out Centos 7.iso file
after selecting Centos 7.iso file
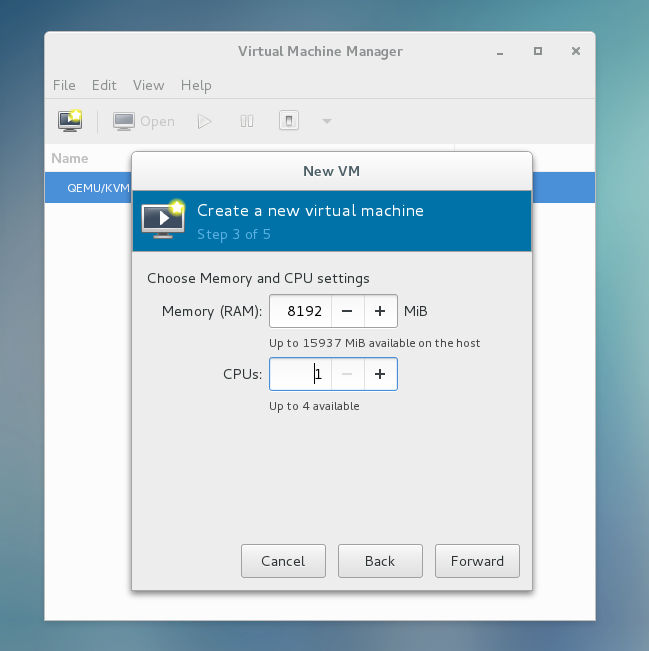
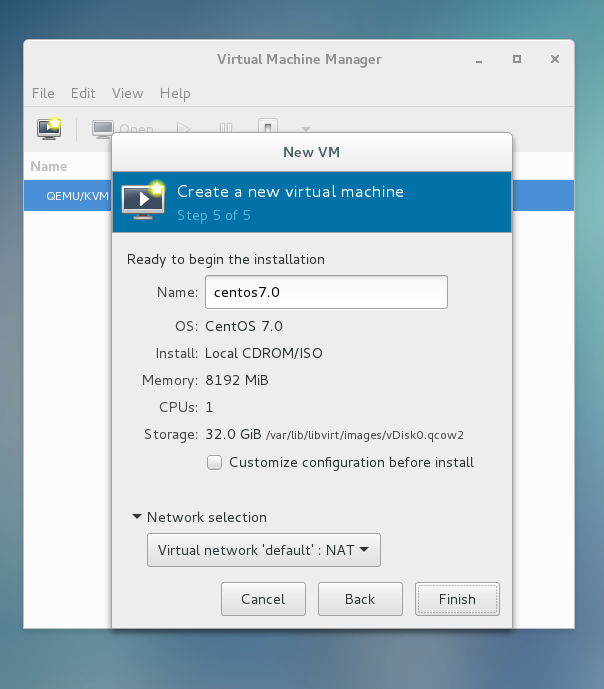
Fourth of all, Choose the size of RAM and The number of CPUs.
In my case, I chose that the size of ram is 8192 MiB and the number of CPUs is 1.
Fifth of all, Choose where you create disk image,in other words, What the booting disk is ?
You can choose what you want in the below.
First, Default location
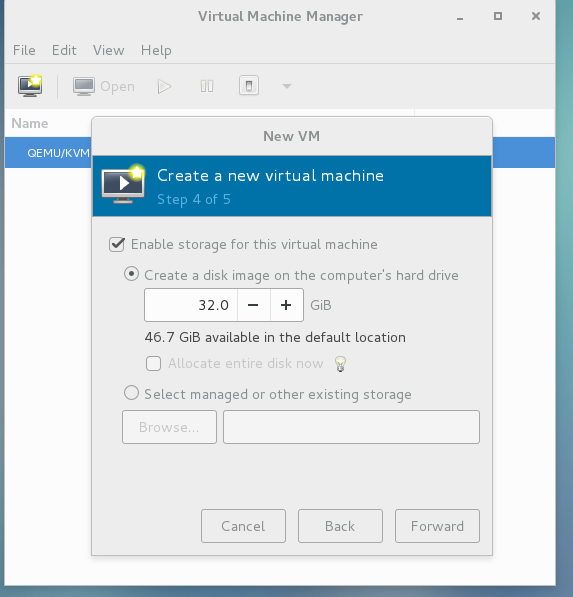
Second, the virtual hard disk i made in default location —-> this is my choice.
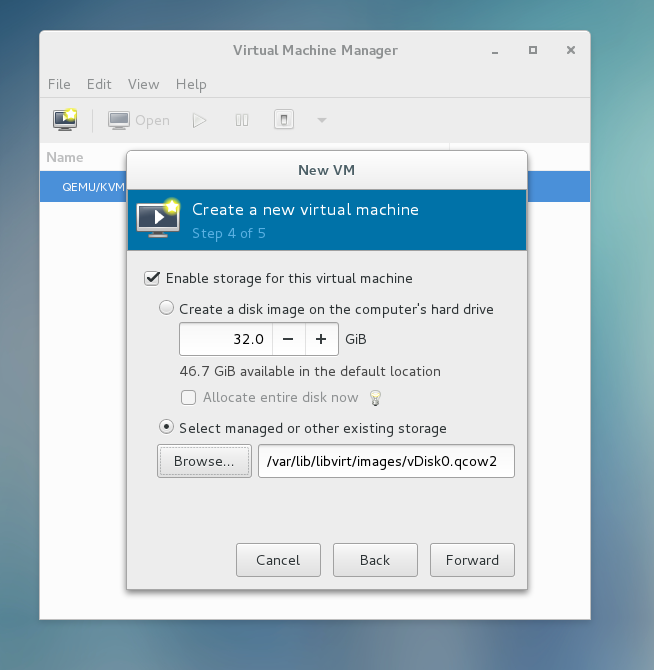
Third, the other location when I looked for Centos 7.iso file, I made.
SiXth of all, final status
In my case, I chose the status I had made until Sixth of all, Network selection is default setting.
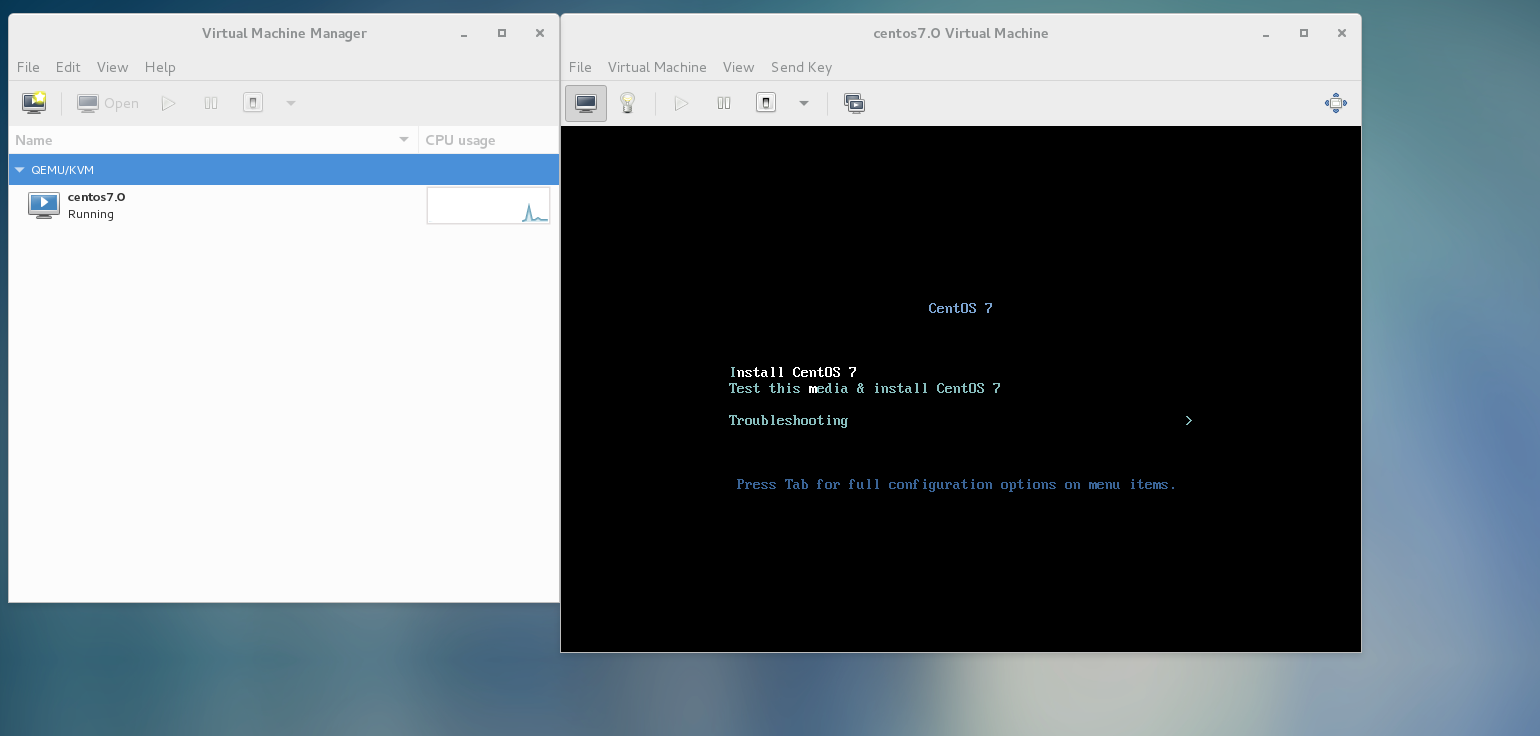
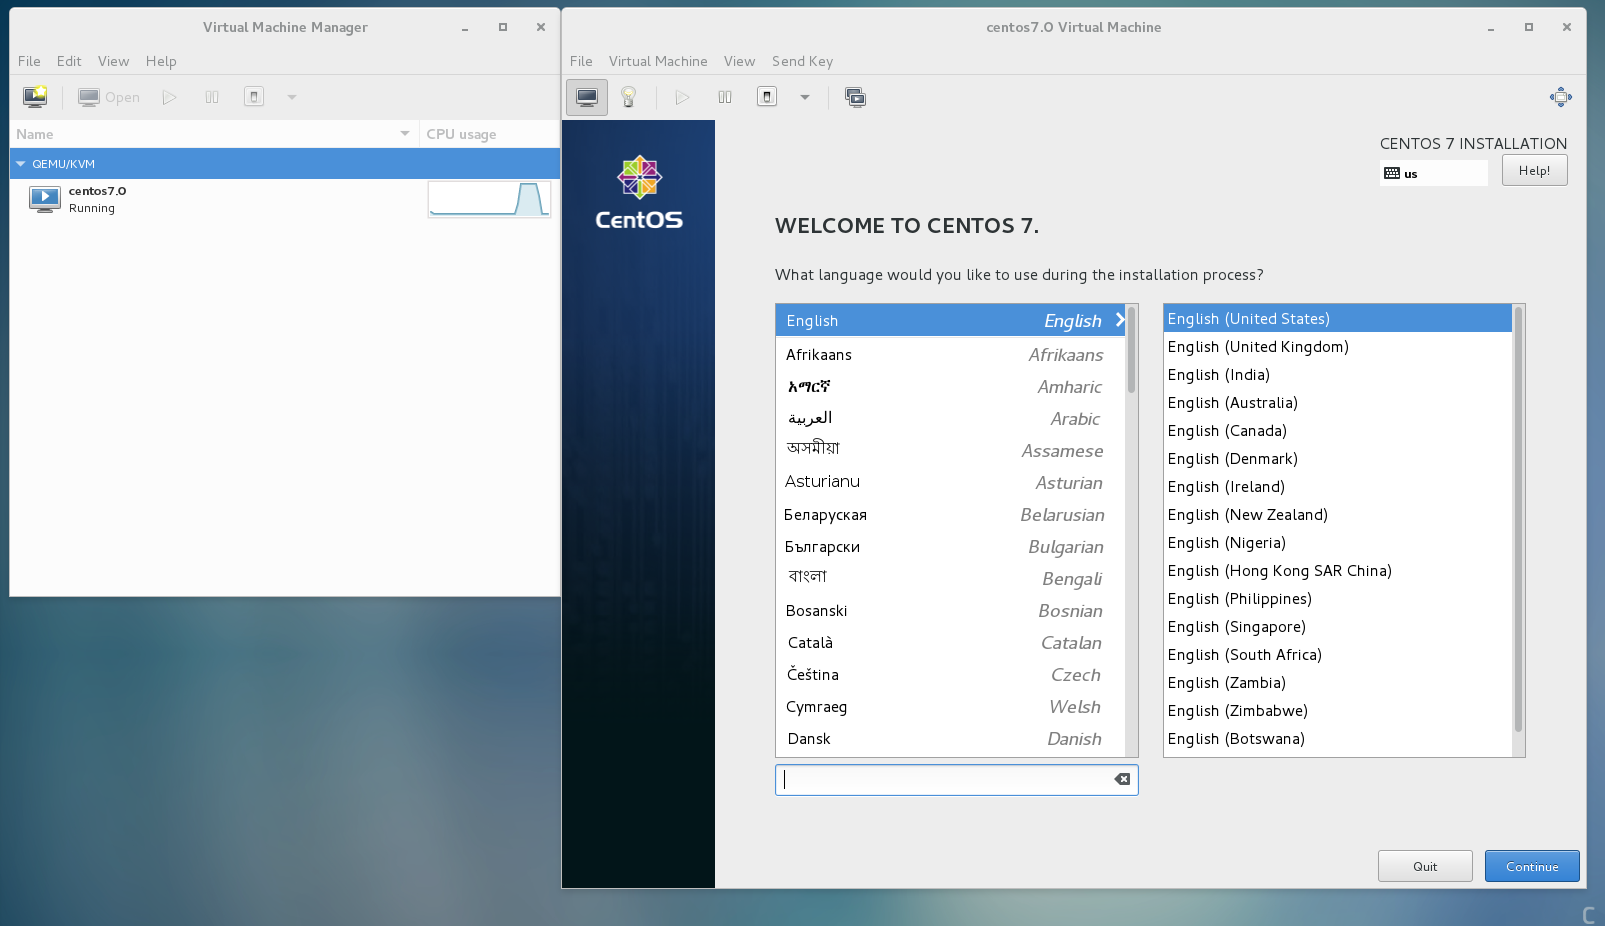
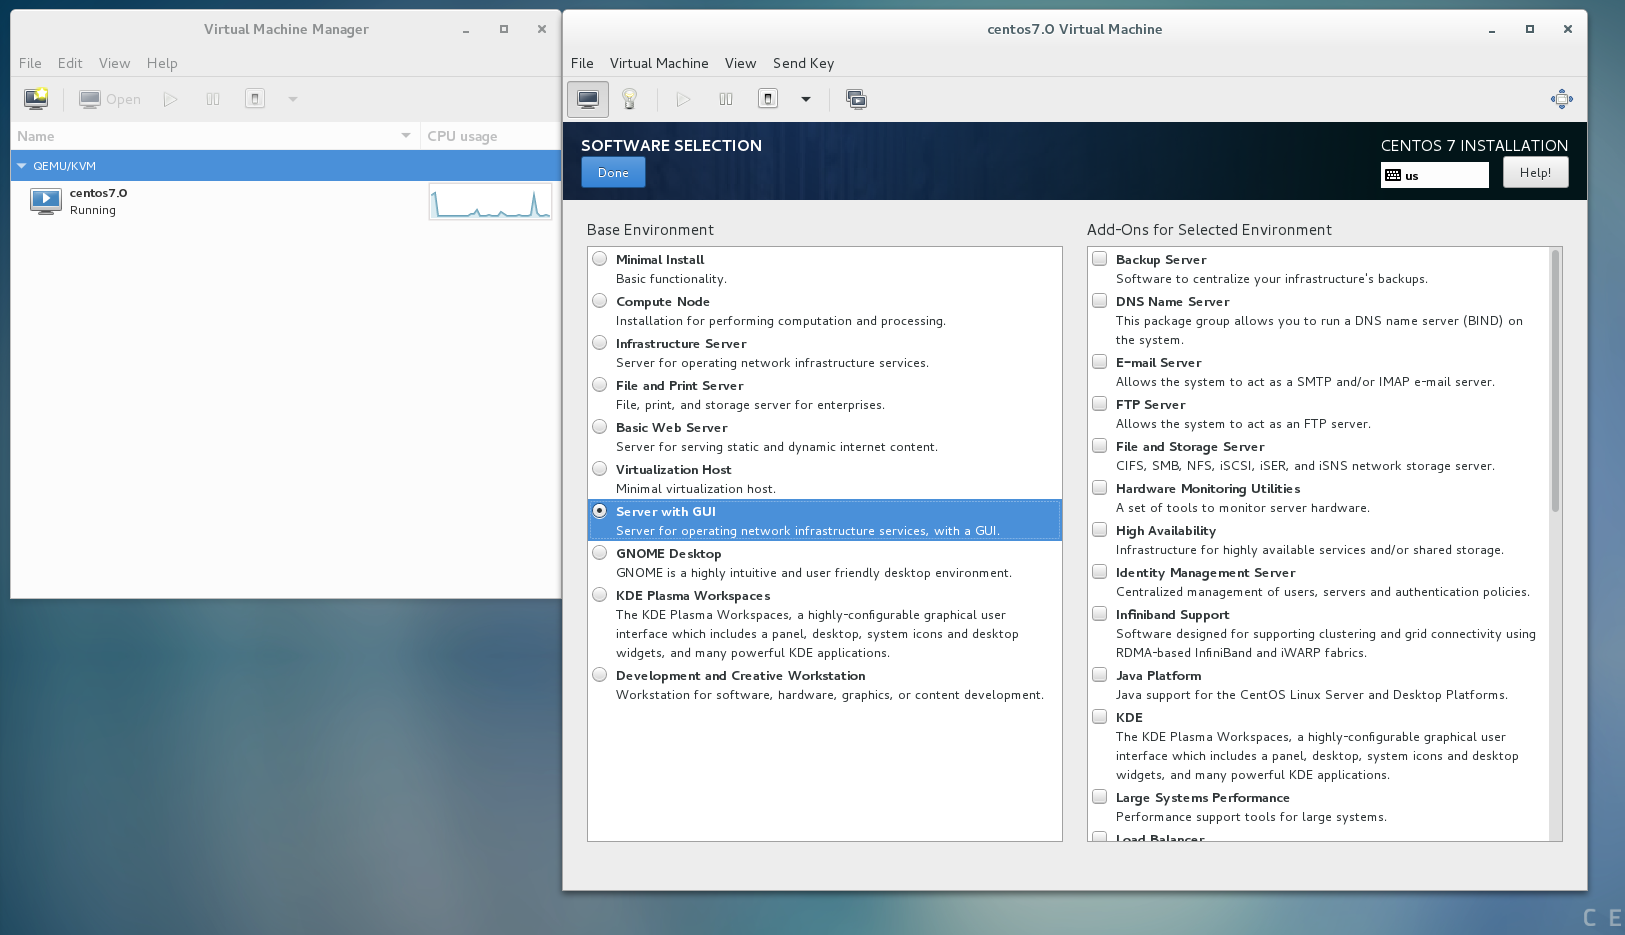
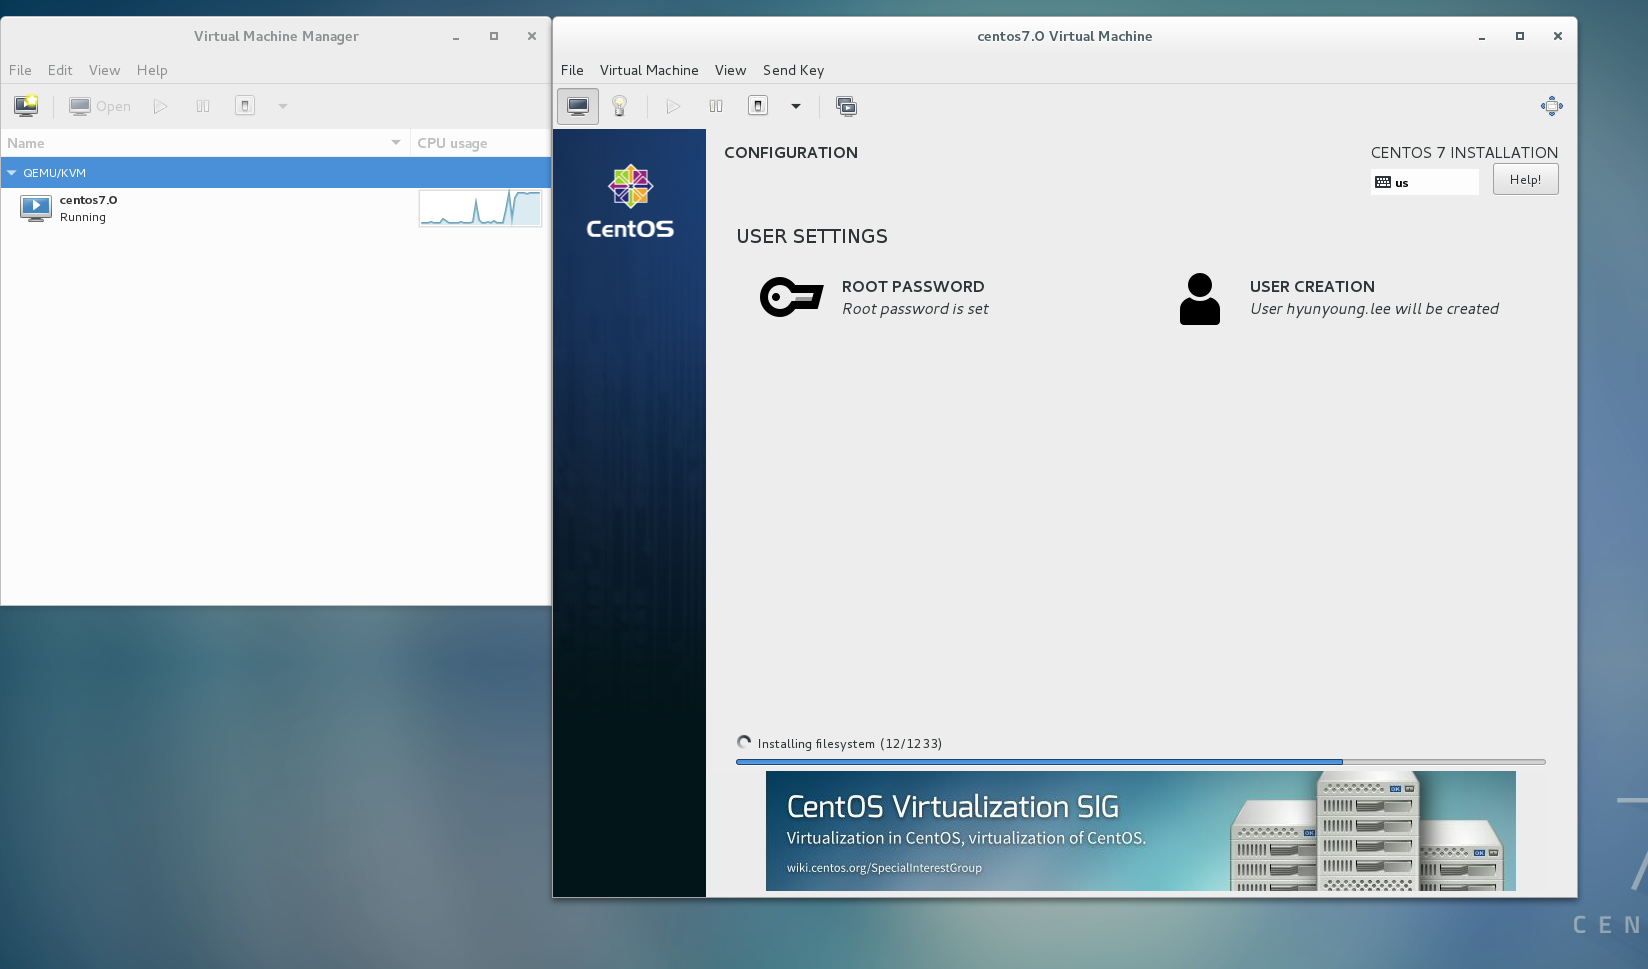
Sevevth of all, install CentOS 7 And Basic Setting
In my case, I chose the install CentOS 7.


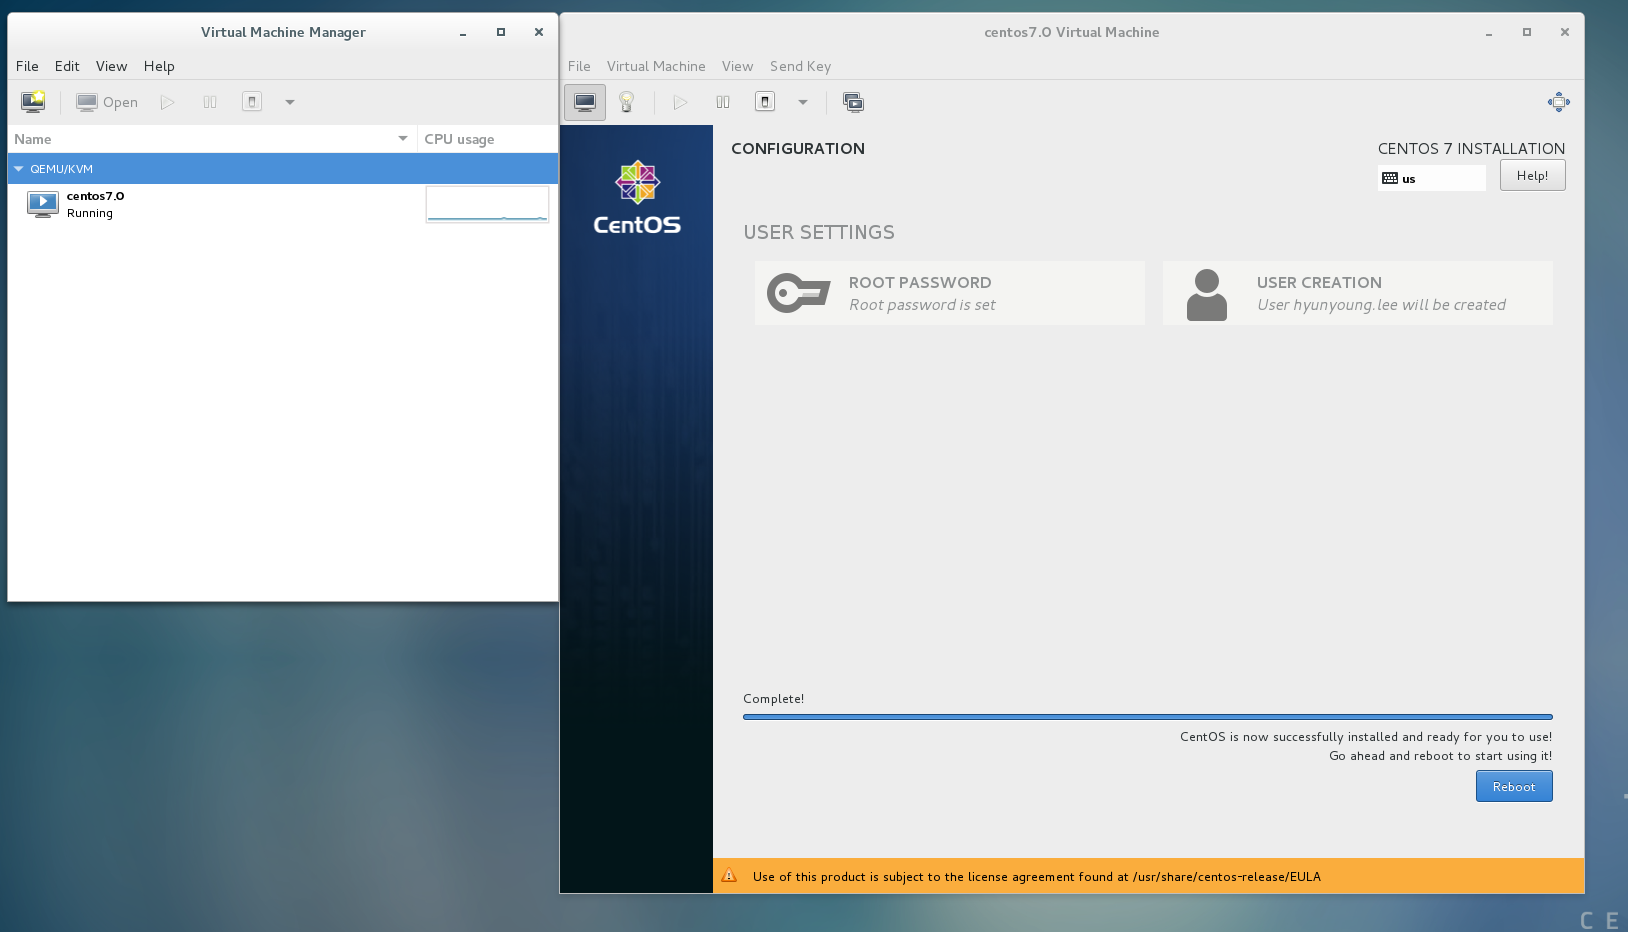
After installation CentOS 7 6.png, press the button,”reboot”
After the above thing,
You have to configure the basic setting like following image.
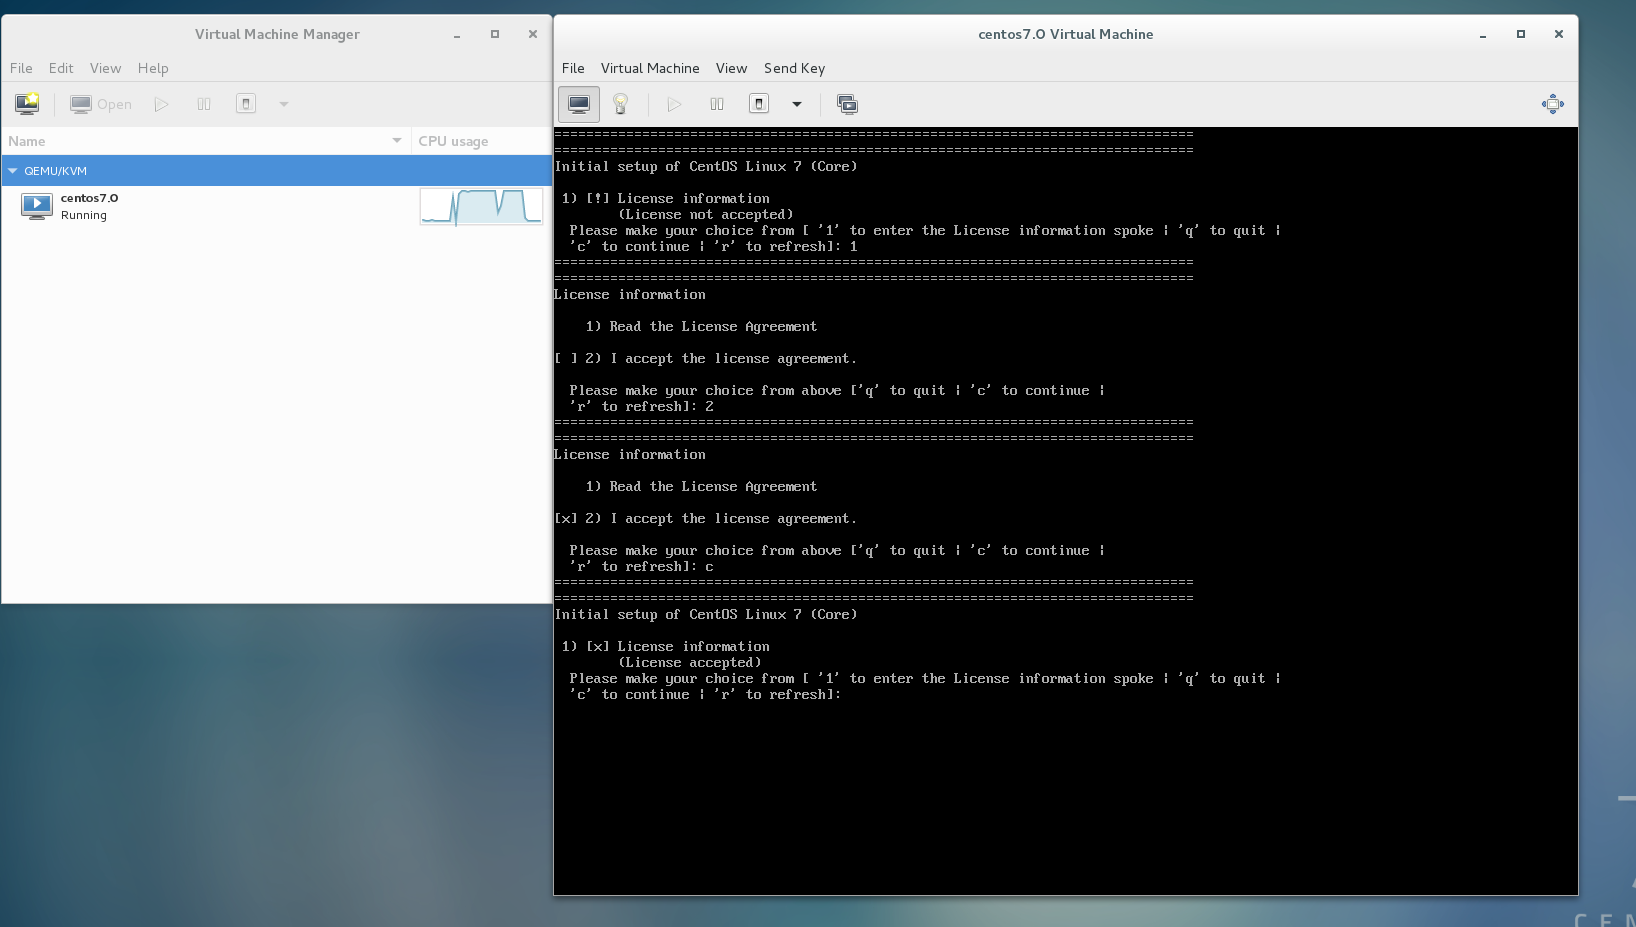
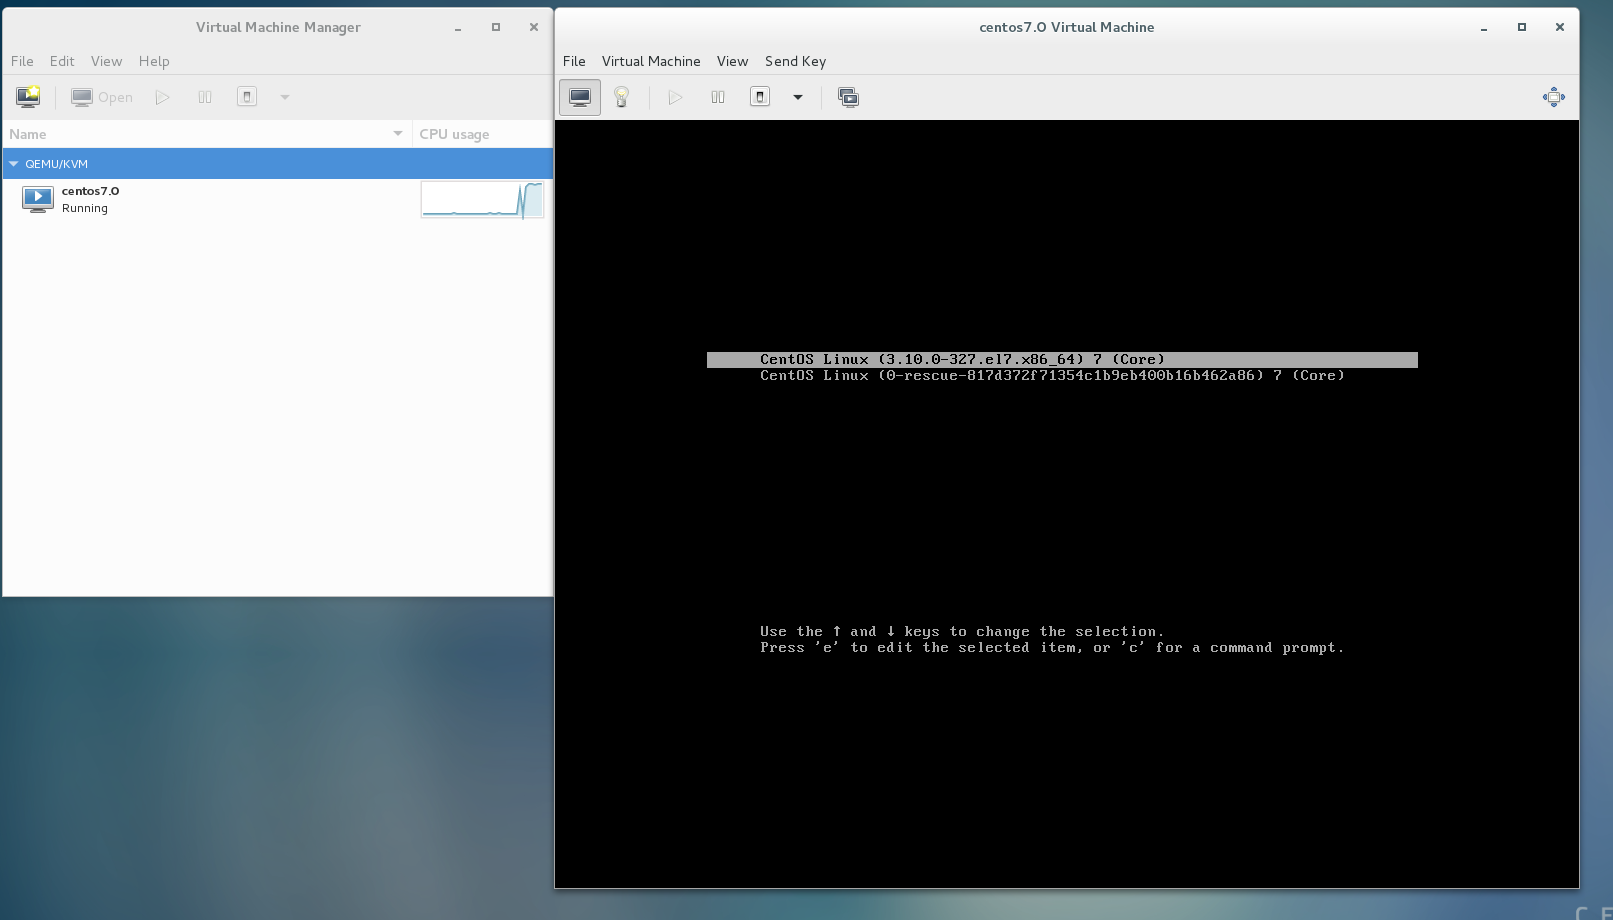
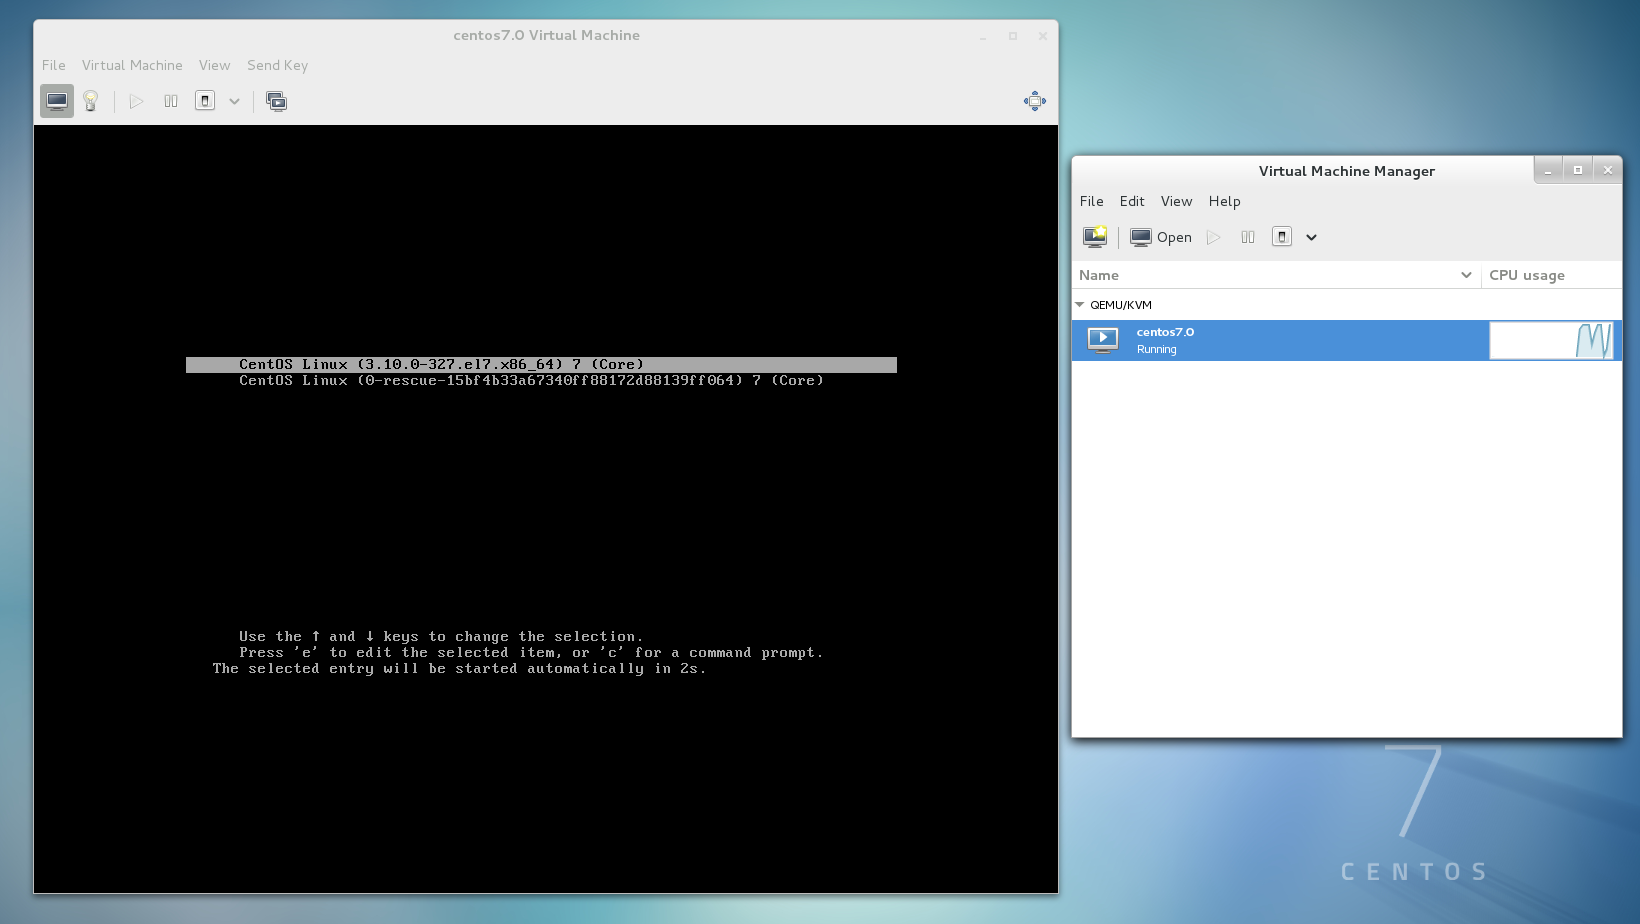
Finally, enter ‘c’!!
Summary of Installing QEMU-KVM
1. Round until execution of “ virt-manager “ Tool
When starting executing qemu. you have to check your system, whether your system supports Virtualization or not.
-------------------- how to check if your system support virtualization -------------------
$ egrep '(vmx|svm)' /proc/cpuinfo
OR
$ grep -e 'vmx' /proc/cpuinfo
$ grep -e 'svm' /proc/cpuinfo
-----------------------------------------End-----------------------------------------------
** vmx is Intel(R) CPU**
** svm is AMD CPU **
from now on, I will explain you based on Intel system
And you need to install utility to execute QEMU-KVM
-------------------utility you need to execute qemu---------------------------
$ sudo yum install qemu-kvm qemu-img (first)
- minimum requirement to deploy virtual platfor on your host
$ sudo yum install virt-manager libvirt libvirt-python libvirt-client

- For RHEL/Centos7 users, also still having additional package groups - for your choice. jsut this is option.
$ yum groupinstall virtualization-client virtualization-platform virtualization-tools
Above method, I got blog made on feburary 26.2015
anothe way to install utility, in my case, I entered the below command
(itzgeek’s blog on November 25, 2014)
- What I recommend you is for installing QEMU-KVM
$ yum install qemu-kvm qemu-img virt-manager libvirt libvirt-python libvirt-client virt-install virt-viewer
-------------------------------------End-------------------------------------
Finally, you can execute virt-manager tool. But, If you hava a trouble when you execute virt-manager tool.
You need to know more for executing virt-manager as follows.
You have to check If your kernel supports KVM(Kernel based virtual Machine)
If working is so slow. You have to turn on this mode, because KVM influences the performance (acceleration) of execuntion of QEMU-KVM virtualization.
In other words, If you have problem like the following pciture
———–turn on virtualization on Intel system————
- press F1 button
- go to cpu feature
- turn on virtualization
**In my case, after configure this state, alwasy my system turns on virtualization**
————————————-End——————————
After the above action, If lsmod | grep kvm is not the same the following image, One more try such as the above, “turn on virtualization” for acceleration
----------------------------- how to check kernel's kvm--------------------------
$ lsmod | grep kvm
------------------------------------------End------------------------------------

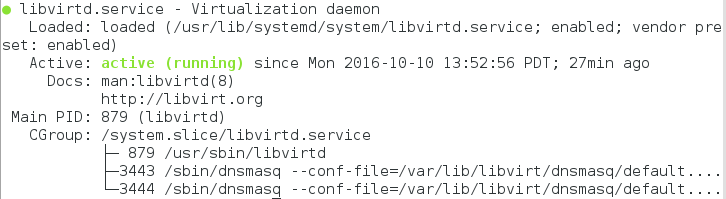
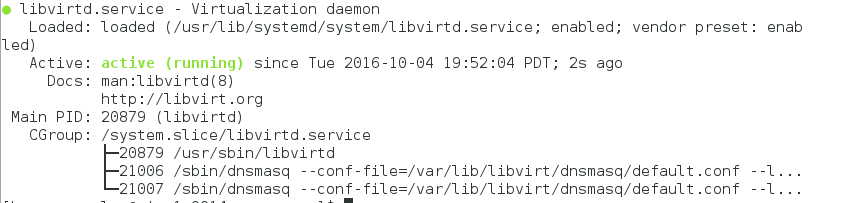
And another checking is whether libvirtd(libvirtd.service - Virtualization daemon) is active or not.
------ how to check if libvirtd(libvirtd.service - Virtualization daemon) is active --------
$ systemctl status libvirtd
OR
$ service libvirtd status
-----------------------------------------End-------------------------------------------------

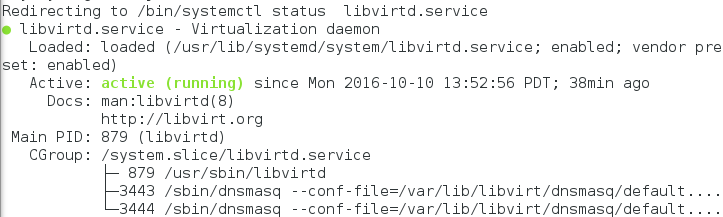
You have to change the status of libvirt daemon from the above picture to the below picture
------ how to turn on libvirtd(libvirtd.service - Virtualization daemon) -------------------
$ sudo systemctl restart libvirtd
- I recommend you sudo or Selinux be in Permissive mode. but I don't know Selinux yet
**BUT in my case, I don't need to type "systemctl restart libvird. Because if I reboot your system, the daemon automatically work.**
-----------------------------------------End-----------------------------------------------
Now, You can see screean like the below image
 --------------------- start of vir-manager --------------------
 $ virt-manager
 ---------------------------------------------------------------
After pressing button, ‘Create a new virtual machine’
Now you can execute virt-manager!! finally ^^
One more time, summary of the entire process from installing QEMU to Guest OS
Carefully, you have to read this sentence
It also can be used together with KVM in order to run virtual machines at near-native speed (requiring hardware virtualization extensions on x86 machines)
First, you have to check cpuinfo if that have vmx, or svm.
$ egrep ‘(vmx|svm)’ /proc/cpuinfo
or
in Intel-based hosts.
$ grep -e ‘vmx’ /proc/cpuinfo
in AMD-based host.
$ grep -e ‘svm’ /proc/cpuinfo
Second, you have to check if kvm is loaded.
$ lsmod | grep kvm
if the result is the same from below figure. you can use kvm module

if not, you have to fix from Bios.
there are details in Enabling Inter(R) VT and AMD-V virtualization Hardware extension
In my case, I pressed “F1” key after that, I could do virtaulization.
Third, you have to install utility for kvm and qemu
$ sudo yum install qemu-kvm qemu-img virt-manager libvirt libvirt-python libvirt-client
– just even if you use this, you can continue installing and execuingn virt-manager.
**What I recommend is :
$ sudo yum install qemu-kvm qemu-img virt-manager libvirt libvirt-python libvirt-client virt-install virt-viewer
the above is my choice.
$ sudo yum install kvm virt-manager libvirt virt-install qemu-kvm xauth dejavu-lgc-sans-fonts
I think You don’t have to install the below utility.
But, For RHEL/CentOS7 users, also still having additional package groups such as: Virtualization Client, Virtualization Platform and Virtualization Tools to install.
$ sudo yum groupinstall virtualization-client virtualization-platform virtualization-tools
Fourth, Start of ‘libvirtd’ daemon
** check Whether libvirtd is active or not
$ systemctl status libvirtd
  ● libvirtd.service - Virtualization daemon
   Loaded: loaded (/usr/lib/systemd/system/libvirtd.service; enabled; vendor preset: enabled)
   Active: active (running) since Mon 2016-10-03 17:39:43 PDT; 2h 11min ago
     Docs: man:libvirtd(8)
           http://libvirt.org
 Main PID: 868 (libvirtd)
   CGroup: /system.slice/libvirtd.service
           ├─ 868 /usr/sbin/libvirtd
           ├─2295 /sbin/dnsmasq --conf-file=/var/lib/libvirt/dnsmasq/default....
           └─2296 /sbin/dnsmasq --conf-file=/var/lib/libvirt/dnsmasq/default....
Finally, execute virt-manager for start of QEMU-KVM
$ virt-manager
from now on, here can show you install process.
execute virt-manager
this is just screen of start.
choose method to install
I selected local method configured disk to virtual storage.
Ios file
ram and cpu size
total system size
last way
after pressing finish button in last way
right after booting, Screen shot
Although you have to configure system of Centos.
Warning problem
you are not available of kvm.
In order to solve this problem. I enabled virtualization of Intel CPU in QEMU-KVM, speed is accelerated.
Initial status of qemu-kvm
Reference
-
KVM hypervisor - To sum up, multiple OSes shares a single hardware host
-
QEMU-KVM installation that I refered to
-
itzgeek site in November 25, 2014
-
jensd written in August 27, 2014
-
tecmint –> The best site for you to know how to install QEMU-KVM,How to Create Virtual Machines in Linux Using KVM (Kernel-based Virtual Machine) – Part 1
-
How to use the acceleration of hardware virtualization of CPU
-
Enabling Inter(R) VT and AMD-V virtualization Hardware extension that I recommend to read.
Extra invetigation of terminology
vmx
DHCP
DNS
MAC - this address is allocated on each ports. So
BIO
there are two type of BIO  - One is lecacy mode
                           - another is UEFI (F11)
swap directory of Linux.
NOR memory
/proc/ directory
Hyper Threading.
Server CPU name Xeon E3 E#…
cpu 0 cpu 1                |
                           |
            normemory Bio  |  BMC (board Management cotroller) - IPMI(protocol)
                           |
                           |