When you use remote server. you have a inconvenience. So I recommend you this VNC for more environment of development
What is the VNC
by information of wiki,
To sum up, VNC(virtual Network Computing) is a graphical desktop system that uses the Remote Frame buffer protocol (RFB) to remotely control another computer. It transmits the keyboard and mouse events from one computer to another, relaying the graphical screen updates back in the other direction. over a network.
Another reference.
As you can see on the another reference,
VNC works on a client/server model : A VNC viewer (or client) is istalled on the local computer and connects to the server component, which must be installed on the remote computer.
regarding working of VNC server,
The sever transmits a duplicate of the remote computer’s display screen to the viewer. It also interprets commands coming from the viewer and carries them out on the remote computer.
feature of VNC is platfrom-independent and is compatible with any operating system. Computers must be networked with TCP/IP and have open ports allowing traffic from the IP addresses of devices that may need to connect
after reaing Techtarget site.
I realized my procedure of installing VNC.
First, I have to install viewer on client I will use.
Second, on server I will use, in order to connect to view. I have to install server of VNC.
For installation of VNC, I will try on two cases.
First is Windows 7(Client) & Linux - CentOS 7(Server)
Second is CentOS 7(Client) & CentOS 7(Server)
First of all, in case I will utilize for installation of VNC.
The same thing is just that server is CentOS 7(server).
So I will explain to you how to set up Serever with three sites.
In other words, About setting of VNC server
Server setting of VNC
First of all, RedHat
First Site is Redhat.
On Chapter 10. TIGERVNC, As you can read contents of redhat’s Installing VNC Server.
The most important thing is TigerVNC works on the Client-server principle :
Server shares its output(VNCserver) and Client(VNCviewer) connects to server.
Characteristic of VNCServer is users run separate sessions in parallel on a machine which can then be accessed by any number of clients from anywhere. i.e VNC is platform-independent.
I emphasize one thing, from now on, my explanation bases that OS of server is CentOS 7
step 1. Install TigerVNC server with issuing the following command as root :
# yum install -y tigervnc-server
step 2. Configure VNC Server
You need to creat configuration file.
So issue the following command as root :
# cp /usr/lib/systemd/system/vncserver@.service /etc/systemd/system/vncserver.service
a carfule point :
There is no need to include the display number in the file name because systemd automatically creates the appropriately named instance in memory on demand, replacing ‘%i’ in the service file by the display number.
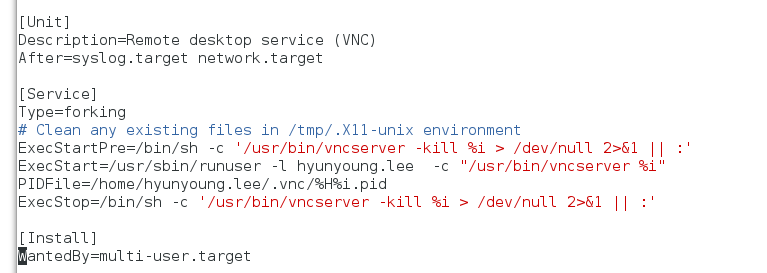
And then, you have edit /etc/systemd/system/vncserver@.serivce, replacing USER with the actual user name,
In my case of installation, USER=hyunyoung.lee
Leave the remaining lines of the file unmodified.!
The Original
ExecStart=/usr/sbin/runuser -l USER -c “/usr/bin/vncserver
%i -geometry 1280x1024”
PIDFile=/home/USER/.vnc/%H%i.pid
My case
ExecStart=/usr/sbin/runuser -l Hyunyoung.ee -c “/usr/bin/vncserver
%i -geometry 1280x1024(or 1920x1080)”
PIDFile=/home/Hyunyoung.lee/.vnc/%H%i.pid
BUT, If you want to root
ExecStart=/usr/sbin/runuser -l root -c “/usr/bin/vncserver
%i -geometry 1280x1024(or 1920x1080)”
PIDFile=/root/.vnc/%H%i.pid
And To make sure that your changes take effect.
issue the following command
# systemctl daemon-reload
for password of user defined in the configuration file.
Note that, you need to switch from root to USER first
# su - USER in my case, su - hyunyoung.lee -> this means switching from su to USER
$ vncpasswd –> this means passwd of vnc when client accesses this machine with VNC Client.
Password:
Verify:
step 3. Start VNC Server
To start or enable the service, specify the display number directly in the command.
The file configured above in etc/systemd/system/vncserver@.service works as a template, in which %i is subsitituted with the display number by systemd. With a valid display number, execute the following command :
# systemctl start vncserver@:display_number.service
In my case
# systemctl start vncserver@:1.service (for Windows)
# systemctl start vncserver@:2.service (for CentOS 7)
You can also enable the service to start automatically at system start(boot time). Then, When you log in, vncserver is automatically started. As root, issue a command as follows :
# systemctl enable vncserver@:display_number.service
In my case
# systemctl enable vncserver@:1.service (for Windows)
# systemctl enable vncserver@:2.service (for CentOS 7)
At this point, I was wondering Where the display number is started from.
So, I found out one blog of VNC Quick Start Instructions
I cite the above site’s article.
The contents of the above site is as follows :
The VNCserver runs on two ports: 5900 + :”display number” and 5800 + : “display number”. Port 5900 + :
is for the standalone viewer. Port 5800 + : for a java based, web browser viewer. primarily we will be concerned with port 5900 + :
The display number defines which virtual screen the vncserver runs on, and distinguishes among several concurrent VNC Sessions. The display number has the format “:n” where n a small integer number.
On windows, by default the vnc server shows the console desktop and is :0 (so runs on port 5900/5800). Both Linux and Solaris follow the X window display number convetion. So they usually start on :1 or 5901 / 5801 for the firts session (becuase : 0 is taken by the console x Server). when you run vncserver, it will automatically choose a port number that does not already have an Xserver running. Multiple vncservers can be started with different display numbers or the display number can be set on the command line.
To sum up,
For a java based web browser viewer. 5800 + “ display number”
BUT
For Stanalone, 5900 + : “display number”
Primarlily we will be concerned with port 5900 +
display nubmer starts from 1
after you issue the command, systemctl
Multi user case is different, So you have to another site text.
Now, You can access to this VNC sever to use a VNC viewer.
Step 4. terminate a VNC session
similarly to eabling the VNCserver service, you can disable the automatic start of the service at system start(booting time)
# systemctl disable vncserver@:display_number.service
Or, When your system is running, you can stop the service by issuing the following commands as root :
# systemctl stop vncserver@:display_number.service
Before client get access to VNC-Server. at first, Sever have to stop Firewall
In my Case, Server is CentOS. So I refered to Firewall portion of Redhat’s VNCViewer
S0, I Can my action into two ways as follows.
Firts of all, stop Firewall of each port to stop the firewall.
Configuring the firewall for VNC
To open a specific port or a range of ports, make use of the –add-port option to the firewall-cmd command Line tool.
For example, VNC display 7 requires port 5907 to be opened for TCP traffic.
- To open a port for TCP traffic in the public zone, issue a command as root as follows :
$ sudo firewall-cmd –zone=public –add-port=5907/tcp
success
If you enter the above command,”firewall-cmd –zone=public –add-port=5907/tcp”, After success, you get a message as follows
   $ sudo firewall-cmd --zone=public --add-port=5907/tcp
   [sudo] password for hyunyoung.lee:
    Warning: ALREADY_ENABLED
2. To view the ports that are currently open for the public zone, issue a command as follows :

> $ sudo firewall-cmd --zone=public --list-ports
5907/tcp
3. A port can be removed using the firewall-cmd --zone=zone --remove-port=number/protocol command

In my case,

> $ sudo firewall-cmd --zone=public --remove-port=5907/tcp

Note that this changes will not persist after the next system start. To make permanent changes to the firewall,

repeat the commands adding the  **--permanent option**. For more information on opening and closing ports in firewalld,

see [the Red Hat Enterprise Linux 7 Security Guide](https://access.redhat.com/documentation/en-US/Red_Hat_Enterprise_Linux/7/html/Security_Guide/).

i.e,

> $ sudo firewall-cmd --zone=public --permanent --add-port=5907/tcp
> $ sudo firewall-cmd --zone=public --list-ports
> $ sudo firewall-cmd --zone=public --permanent --remove-port=5907/tcp
Another way with FireWarll-cmd to stop FireWall
if you want to allow VNC service in FireWall.
$ sudo firewall-cmd –add-service vnc-server
$ sudo firewall-cmd --add-service vnc-server
success
permanent version
$ sudo firewall-cmd –permanent –add-service vnc-server
for removal of NVC service.
$ sudo firewall-cmd –remove-service vnc-server
$ sudo firewall-cmd --remove-service vnc-server
success
permanent version
$ sudo firewall-cmd –permanent –remove-service vnc-server
To sum up about the above job to stop FireWall
$ firewall-cmd –zone=public –add-port=5907/tcp
$ sudo firewall-cmd –zone=public –list-ports
for removal
$ sudo firewall-cmd –zone=public –remove-port=5907/tcp
**If you want to have permanent changes **
$ firewall-cmd –zone=public –permanent –add-port=5907/tcp
$ sudo firewall-cmd –zone=public –list-ports
for removal
$ sudo firewall-cmd –zone=public –permanent –remove-port=5907/tcp
Unlike the above version,
$ sudo firewall-cmd –add-service vnc-server
for removal
$ sudo firewall-cmd –remove-service vnc-server
In here, if you want to have permanent change
$ sudo firewall-cmd –permanent –add-service vnc-server
for removal
$ sudo firewall-cmd –permanent –remove-service vnc-server
**Another way to stop firewall
$ sudo systemctl stop firewalld
$ sudo systemctl status firewalld
IF you want to restart firewalld
$ sudo systemctl start firewalld
$ sudo systemctl status firewalld
The last method to turn off FireWall on CentOS 7
$ sudo vim /etc/sysconfig/selinux
In the file of /etc/sysconfig/selinux
SELINUX=disabled $ systemctl stop firewalld $ systemctl disable firewalld $ shutdown -r now
Redhat document of VNC - SERVER
test of how to install VNC - SERVER
Client setting of VNC
Next stage to cennect to VNC server on VNC-viewer
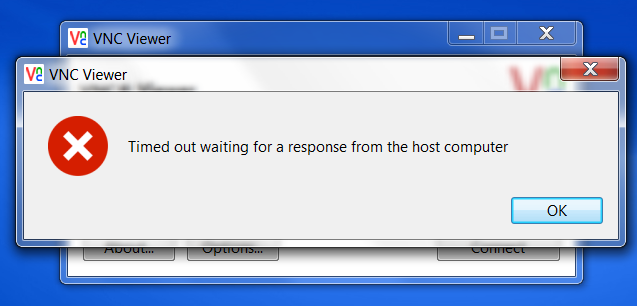
I will use realVNC client tool. but After installation of the above VNC-server.
I got access but, I got a message of error that is “Timed out waiting for a response from the host computer”
I think that’s because FireWall works, So I will try to remove the FireWall.
Before I turn off the Firewall, I cannot get access.
as I expected, after turning the FireWall off Or opening a specific port. I can get access to VNCServer.
From now on, I will access with two ways to VNCServer.
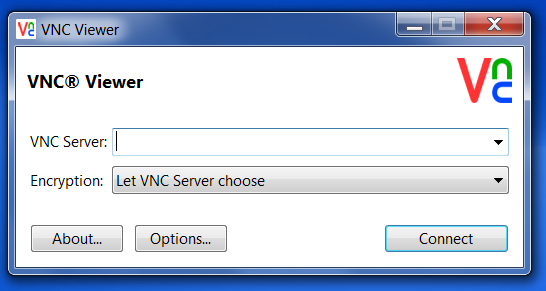
For Windows Client With realVNC
my case is windows 7 client
I think this way is the most simple.
Just first Install the realVNC.
After download. you can get the below window. **maybe if you want to know security about realVNC, see FAQ of realVNC
several of the following image refered to image of digitaloneocean’s VNC installation](https://www.digitalocean.com/community/tutorials/how-to-install-and-configure-vnc-remote-access-for-the-gnome-desktop-on-centos-7)
- execute VNC Viwer of RealVNC, In box of VNC Server, You have to ip address and port number of VNC server
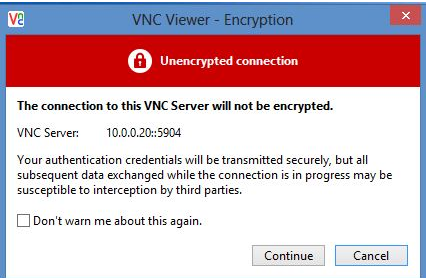
- If you stop FireWall of VNCServer, you will get the below windows.
- So, you are going to have to stop the FireWall of VNCserver, After that, You can get access to VNCServer.
So if it works well, you will get the below similar window.
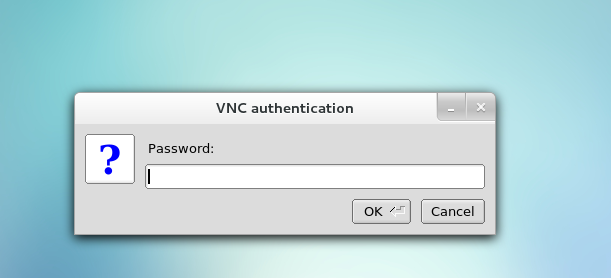
- After number 3. You have to use password that you configrued when issuing “vncpasswd” with password like this :
- In USER Mode On VNC-Server. You have to configure passwd for client to use when client accesses with VNC-Client.
$ vncpasswd
Password:
Verify:
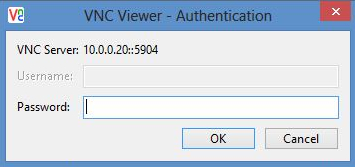
- Finally, you cat get a access to VNC Server
For Linux Client
my case is CentOS 7 client
the following explanation refered to VNC Viewer of Red Hat.
needless to say, it is easier to install and execute once the VNC sever is configured.
Most of all, You have to install VNC viewer.
On CentOS 7
$ sudo yum install -y tigervnc
From now on. I will you about running the vnc viewer on CentOS 7
way to connect to VNC server is divided into three ways
Each ways is Using GUI and Using CLI.
Using GUI
$ sudo yum install -y tigervnc
The format of the command for GUI to connection of server-client is as follows :
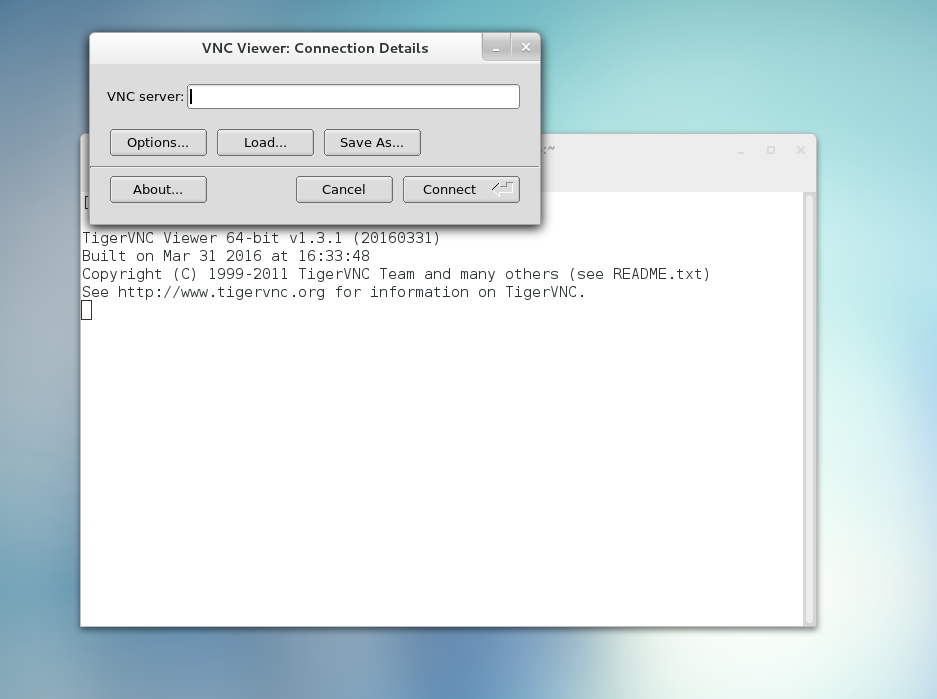
$ vncviewer
After entering The above command, You can see the below window.
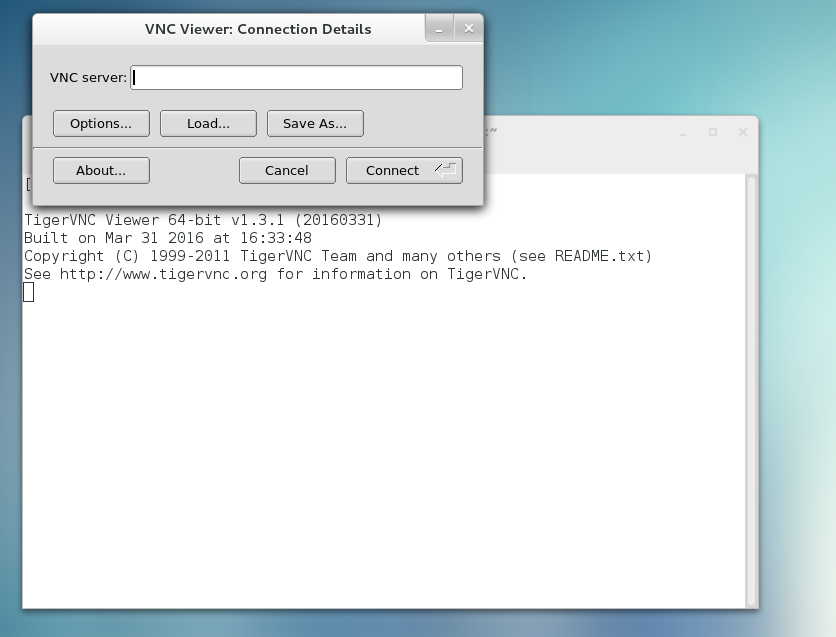
in the box of VNC Server, You have to type your server address and display number
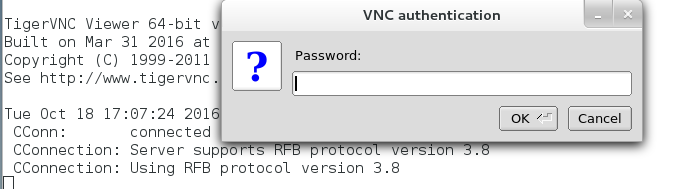
After that, press the button of connect, you can get window entering password that is the same configuring command as follows
- In USER Mode On VNC-Server. You have to configure passwd for client to use when client accesses with VNC-Client.
$ vncpasswd
Password:
Verify:

Finally, you can access VNC Server.
If you want to prevent disconnecting any existing VNC connections to the same display, you can select option to allow sharing of the desktop as follows
A. Select the Option button
B. Selet the Misc tab.
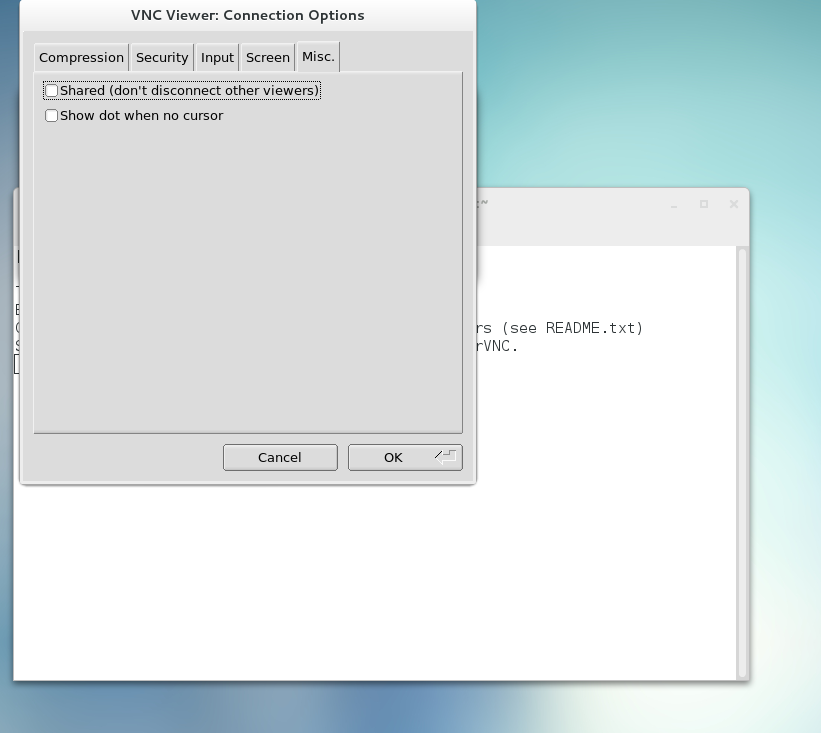
C. selet the Shared button.
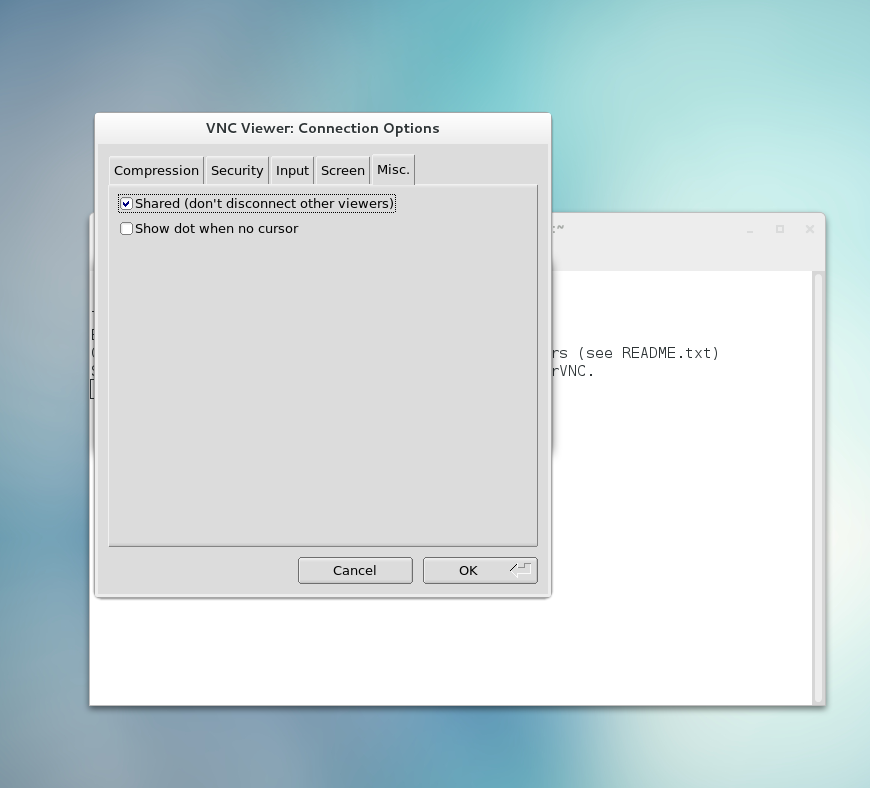
D. Press OK to return to the main menu.
In my case, I didn’t use this because user was one
Using CLI a prompt executiong of VNC Server-client connection
$ sudo yum install -y tigervnc
- Enter the viewer command with the address and display number as arguments :
$ vncviewer address:display_number
Where address is an IP address or host name
In this case, just it is different to enter host address and display number.
already when you execute vncviewer. You type host address and display number together.
So you don’t have to type host addrss and display number. So just this process entering host address and display number is not abscent In using CLI
and The left process is the same from using GUI

i.e after typing the above command,”$ vncviewer address:display_number”
Just authenticate yourself by entering the VNC password. This will be the VNC password for the user corresponding to the display number unless a global default VNC password was set.
And then, A window appears showing the VNC server desktop, Note that this is not the desktop the normal user sees, it is the Xvnc desktop.
AND if you want to restrict VNC Access on Centos 7, I recommend you VNC viewer of Red hat
Summary of how to install tigerVNC-Client
On CentOS 7
$ sudo yum install -y tigervnc
using GUI
$ vncviewer
using CLI
$ vncviewer address:display_number
On Windows 7
Install the realVNC
Summary of How to install tigerVNC-server.
$ sudo yum install tigervnc-server
$ sudo cp /usr/lib/systemd/system/vncserver@.service /etc/systemd/system/vncserver@.service
$ sudo vim /etc/systemd/system/vncserver@.service
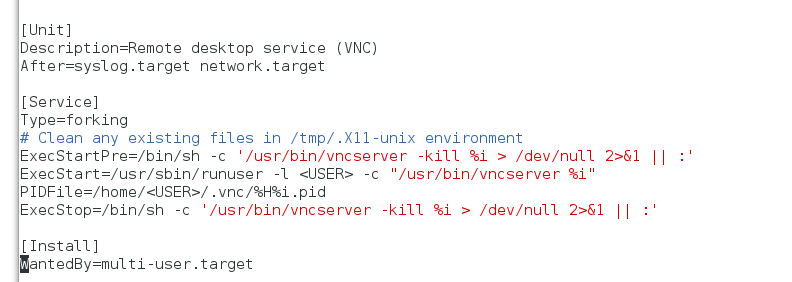
After change to the USER
If user is root, like this
ExecStart=/usr/sbin/runuser -l root -c "/usr/bin/vncserver %i -geometry 1920x1080"
PIDFile=/root/.vnc/%H%i.pid
$ sudo systemctl daemon-reload
in USER Mode, if you are in su mode, just type __“su - USER NAME”__
$ vncpasswd
$ sudo systemctl start vncserver@:1.service
$ sudo systemctl status vncserver@:1.service
$ sudo systemctl stop firewalld
● vncserver@:1.service - Remote desktop service (VNC)
   Loaded: loaded (/etc/systemd/system/vncserver@.service; disabled; vendor preset: disabled)
   Active: active (running) since Mon 2016-10-17 15:06:19 PDT; 1min 42s ago
  Process: 11726 ExecStart=/usr/sbin/runuser -l hyunyoung.lee -c /usr/bin/vncserver %i -geometry 1920x1080 (code=exited, status=0/SUCCESS)
  Process: 11719 ExecStartPre=/bin/sh -c /usr/bin/vncserver -kill %i > /dev/null 2>&1 || : (code=exited, status=0/SUCCESS)
 Main PID: 11778 (Xvnc)
   CGroup: /system.slice/system-vncserver.slice/vncserver@:1.service
           ‣ 11778 /usr/bin/Xvnc :1 -desktop example.com:1 (hyunyoung.lee) -auth /home/hyuny...

Oct 17 15:06:16 example.com systemd[1]: Starting Remote desktop service (VNC)...
Oct 17 15:06:19 example.com systemd[1]: Started Remote desktop service (VNC).
$ sudo systemctl enable vncserver@:1.service – In order to automatically work After booting
Created symlink from /etc/systemd/system/multi-user.target.wants/vncserver@:1.service to /etc/systemd/system/vncserver@.service.
$ sudo systemctl disable firewlld – In order to automatically work After booting