윤성우의 열혈자료구조를 참조했습니다.
1-1. basic Circular LikedList
1-2. Circular LinkedList node add
1-3. Circular LinkedList Strong Point

1-4. Circular LinkedList based on using tail
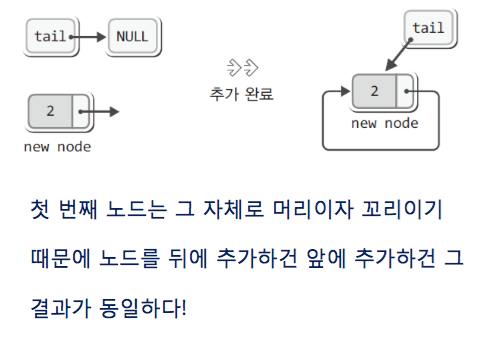
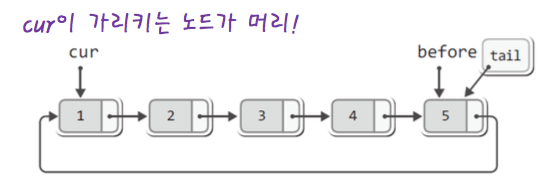
1-4-1. 꼬리만 아는 경우
- 꼬리를 가리키는 포인터 변수는 ?  tail
- 머리를 가리키는 포인터 변수는 ?  tail -> next
* 즉 머리만 알고 있는 것보단 tail만 알아도 꼬리와 머리 주소를 쉽게 알 수 있다.
1-4-2 머리만 아는 경우
- 꼬리를 가리키는 포인터 변수는 ? while문 과 같은 반복문 사용
- 머리를 가리키는 포인터 변수는 ? head
1-5. Compare LinkedList with Circular LinkedList

1-6 Source code
typedef int Data;
typedef struct _node
{
    Data data;
    struct _node * next;

}Node;

typedef struct _CircularLinkedList
{
    Node * tail;
    Node * before;
    Node * cur;
    int numOfData;
}CList;

typedef CList List;

// ArrayList & LinkedList 도 초기화 할때 before and cur 등을 초기화 해도 된다.
void ListInit(List *plist)
{
  plist -> tail = NULL;
  plist -> before = NULL;
  plist -> cur = NULL;
  numOfData = 0;
}

// Circular Linked List Insert
// LInsert & LInsertFront's same part
void LInsert~(List * plist, Data data)
{
    Node * newNode = (Node *) malloc(sizeof(Node));
    newNode -> data = data;

    // if first Node
    if(plist -> tail == NULL)
    {
        plist -> tail = newNode;
        newNode -> next = newNode;
    }
    /// more than second Node
    {
          different part
    }

    (plist -> numOfData)++;
}
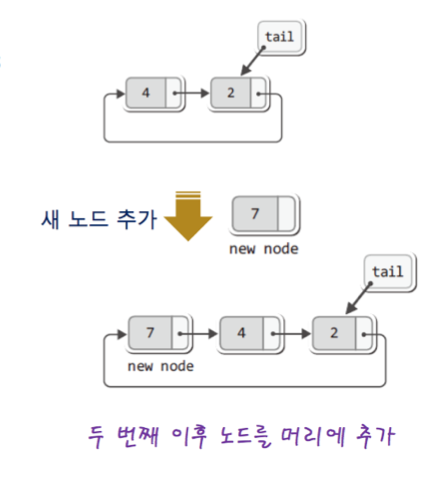
// 만약 두번째 이후 노드는 머리에 추가한다면
void LInsertFront(List * plist, Data data)
{
    Node * newNode = (Node *)malloc(sizeof(Node));
    newNode -> data = data;

    if (plist -> tail == NULL)
    {
        plist -> tail = newNode;
        plist -> next = newNode;
    }
    else
    {
      // 이부분 잘 생각을 해서 정리해야 한다.
       newNode -> next = plist -> tail -> next;
       plist -> tail -> next = newNode;
    }

    (plist->numOfData)++;
}
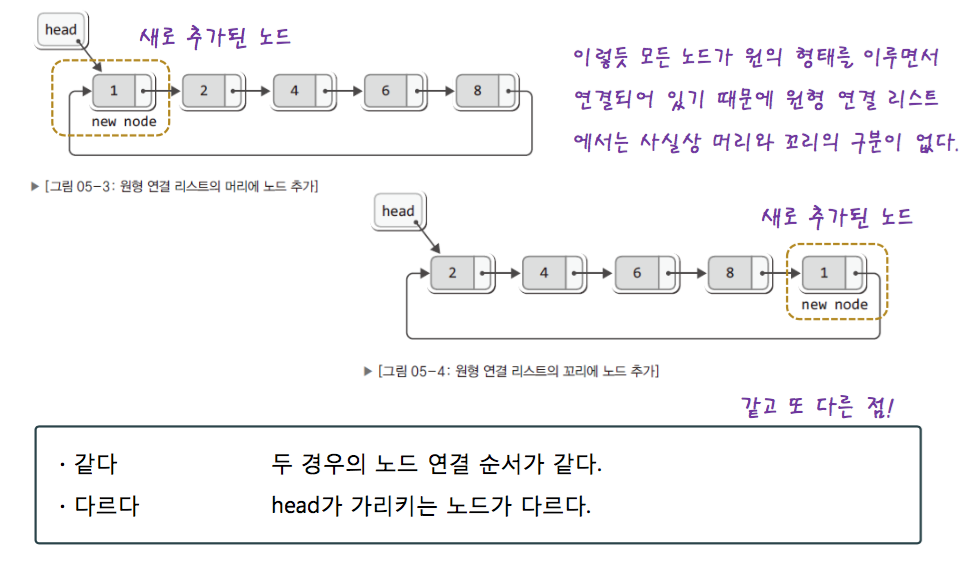
아래 그림이 머리에 추가하는 것을 잘 설명해 줄 것이다.
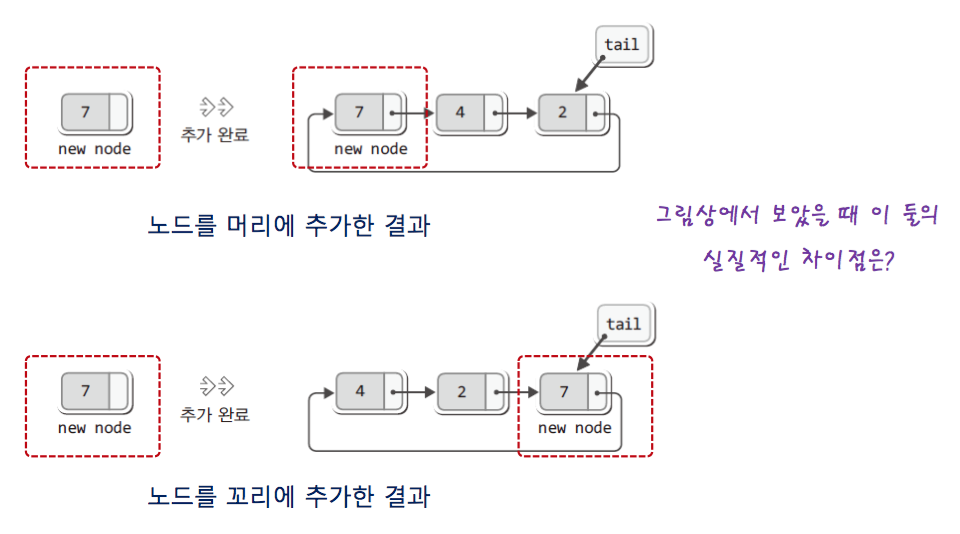
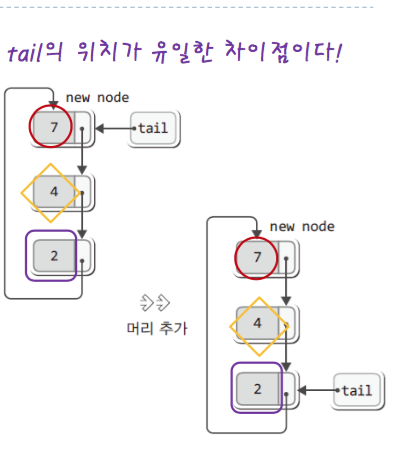
위의 그림을 보면 일단 머리와 꼬리에 노드를 넣을 때 차이 점이 보일 것이다.
이때 이를 기반으로 꼬리에 넣는 코드는 아래와 같다.
// 만약 두번째 이후 노드는 꼬리에 추가한다면
void LInsert(List * plist, Data data)
{
    Node * newNode = (Node *)malloc(sizeof(Node));
    newNode -> data = data;

    if (plist -> tail == NULL)
    {
        plist -> tail = newNode;
        plist -> next = newNode;
    }
    else
    {
       newNode -> next = plist -> tail -> next;
       plist -> tail -> next = newNode;
       plist -> tail = newNode;          // 이부분만 추가하면 된다.
    }

    (plist->numOfData)++;
}
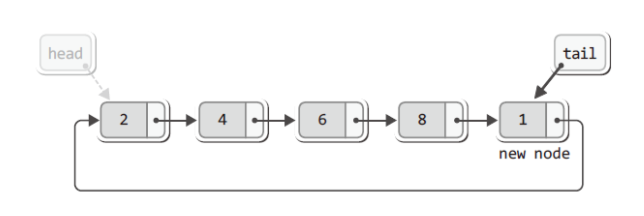
아래의 그림이 꼬리에 추가하는 것을 잘 설명해 줄것이다.
이제부터는 참조하고 삭제부분에 대한 코드를 보겠다.
// Circular LinkedLIst LFirst
int LFirst(List * plist, Data * pdata)
{
    if( plist -> tail == NULL)
        return FALSE;

    // cur , before  초기화 부분
    plist -> before = plist -> tail;
    plsit -> cur = plist -> tail -> next;

    *pdata = plist -> cur -> data;
    return TRUE;
}
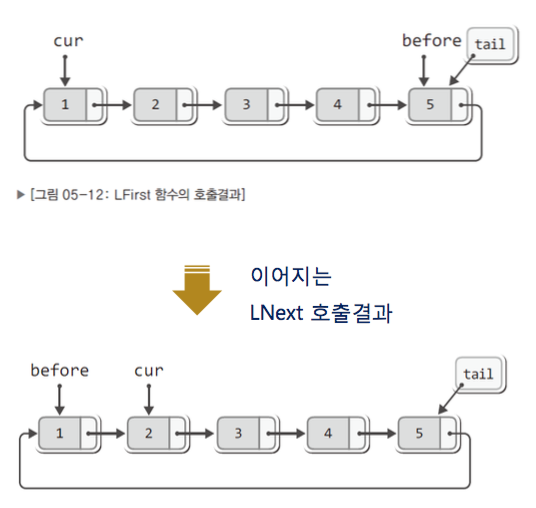
cur, before이 초기화 하는 부분을 아래 그림을 보면 잘 이해 할 수 있을 것이다.
int LNext(List * plist, Data * pdata)
{
    if(plist -> tail == NULL)
        return FALSE;

    // 원형 연결 리스트라 끝을 검사하는 코드가 없다.
    plist ->  before = plist -> cur;
    plist -> cur = plist -> cur -> next;

    *pdata = plist -> cur -> data;
    return TRUE;
}
위의 LNext를 그림으로 표현하면 아래와 같습니다.
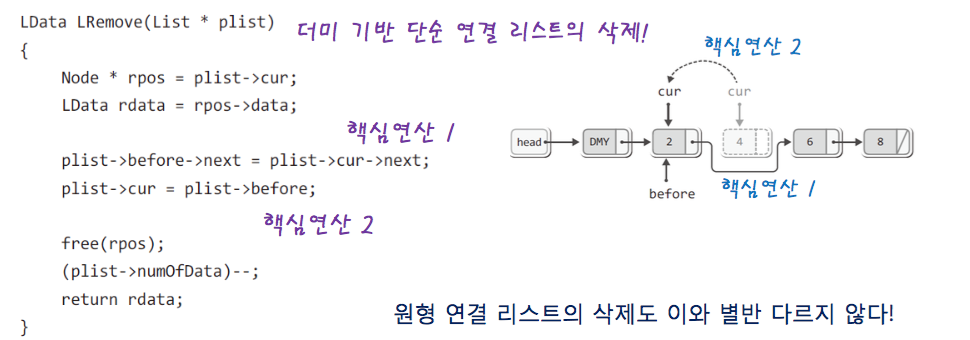
이 다음은 삭제 부분을 LinkedList를 보면 아래와 같다.
-
삭제할 노드의 이천 노드가, 삭제할 노드의 다음 노드를 가르키게 한다.
-
포인터 변수 cur을 한 칸 뒤로 이동시킨다.
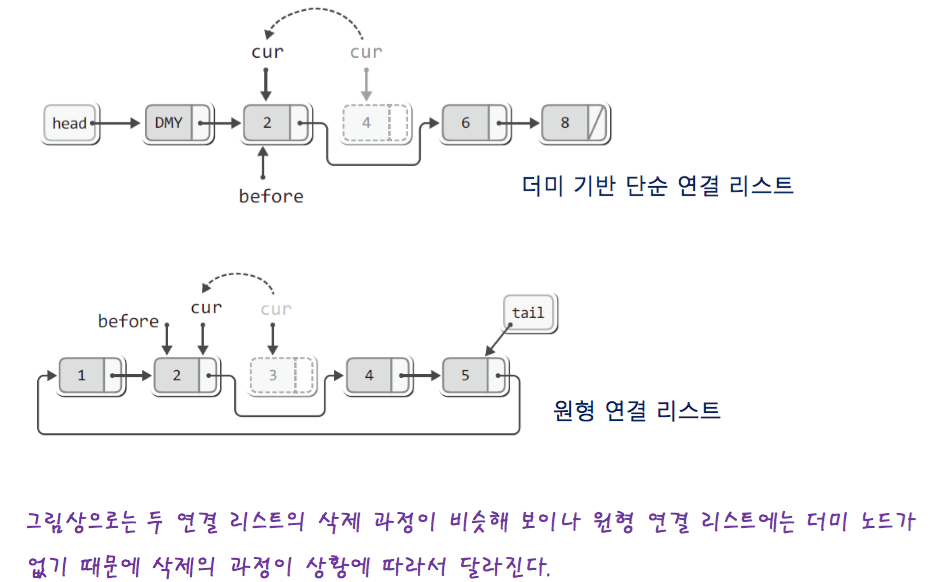
근데 여기서 원형 연결 리스트와 비교를 한다면.
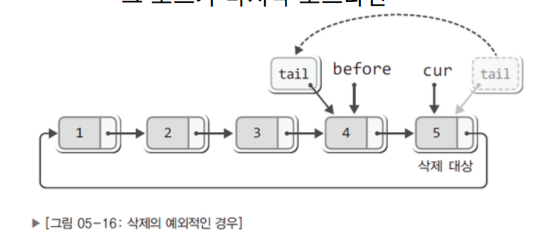
예외적인 상황을 생각을 해야 한다.
- 예외적인 상황 1
- 삭제할 노드가 tail이 가리키는 경우
- 예외적인 상황 2
- 삭제할 노드를 tail이 가리키는 그 노드가 마지막 인경우
이를 아래에서 살펴보자.
LData LRemove(List * plist)
{
  Node * rpos = plist -> cur;
  LData rdata = rpos -> data;

  // 삭제할 노드가 tail을 가리킨다면
  if( rpos == plist -> tail)
  {
      // 그리고 마지막 노드라면
      if(plist -> tail == plist -> tail -> next)
      {
          plist -> tail = NULL:
      }
      else
          plist -> tail = plist -> before;
  }

  /// 일단 이부분은 그냥 LinkedList 와 동일하다. .
  plist -> before = plist -> cur -> next;
  plist -> cur = plist -> before;

  free(rpos);
  (plist -> numOfData)--;

  return rdata;

}
위의 코드의 간단한 그림을 보자면 아래와 같다.